Laravel 数据库性能优化实战(三):聚合统计查询性能优化
前面学院君已经简单演示了在 Laravel 项目中如何通过索引、渴求式加载和指定查询字段优化数据库查询性能,今天我们来看一个聚合统计查询优化的例子。
在很多应用的后台管理面板中,都会有类似下面这种根据不同状态进行聚合统计数据渲染的功能:
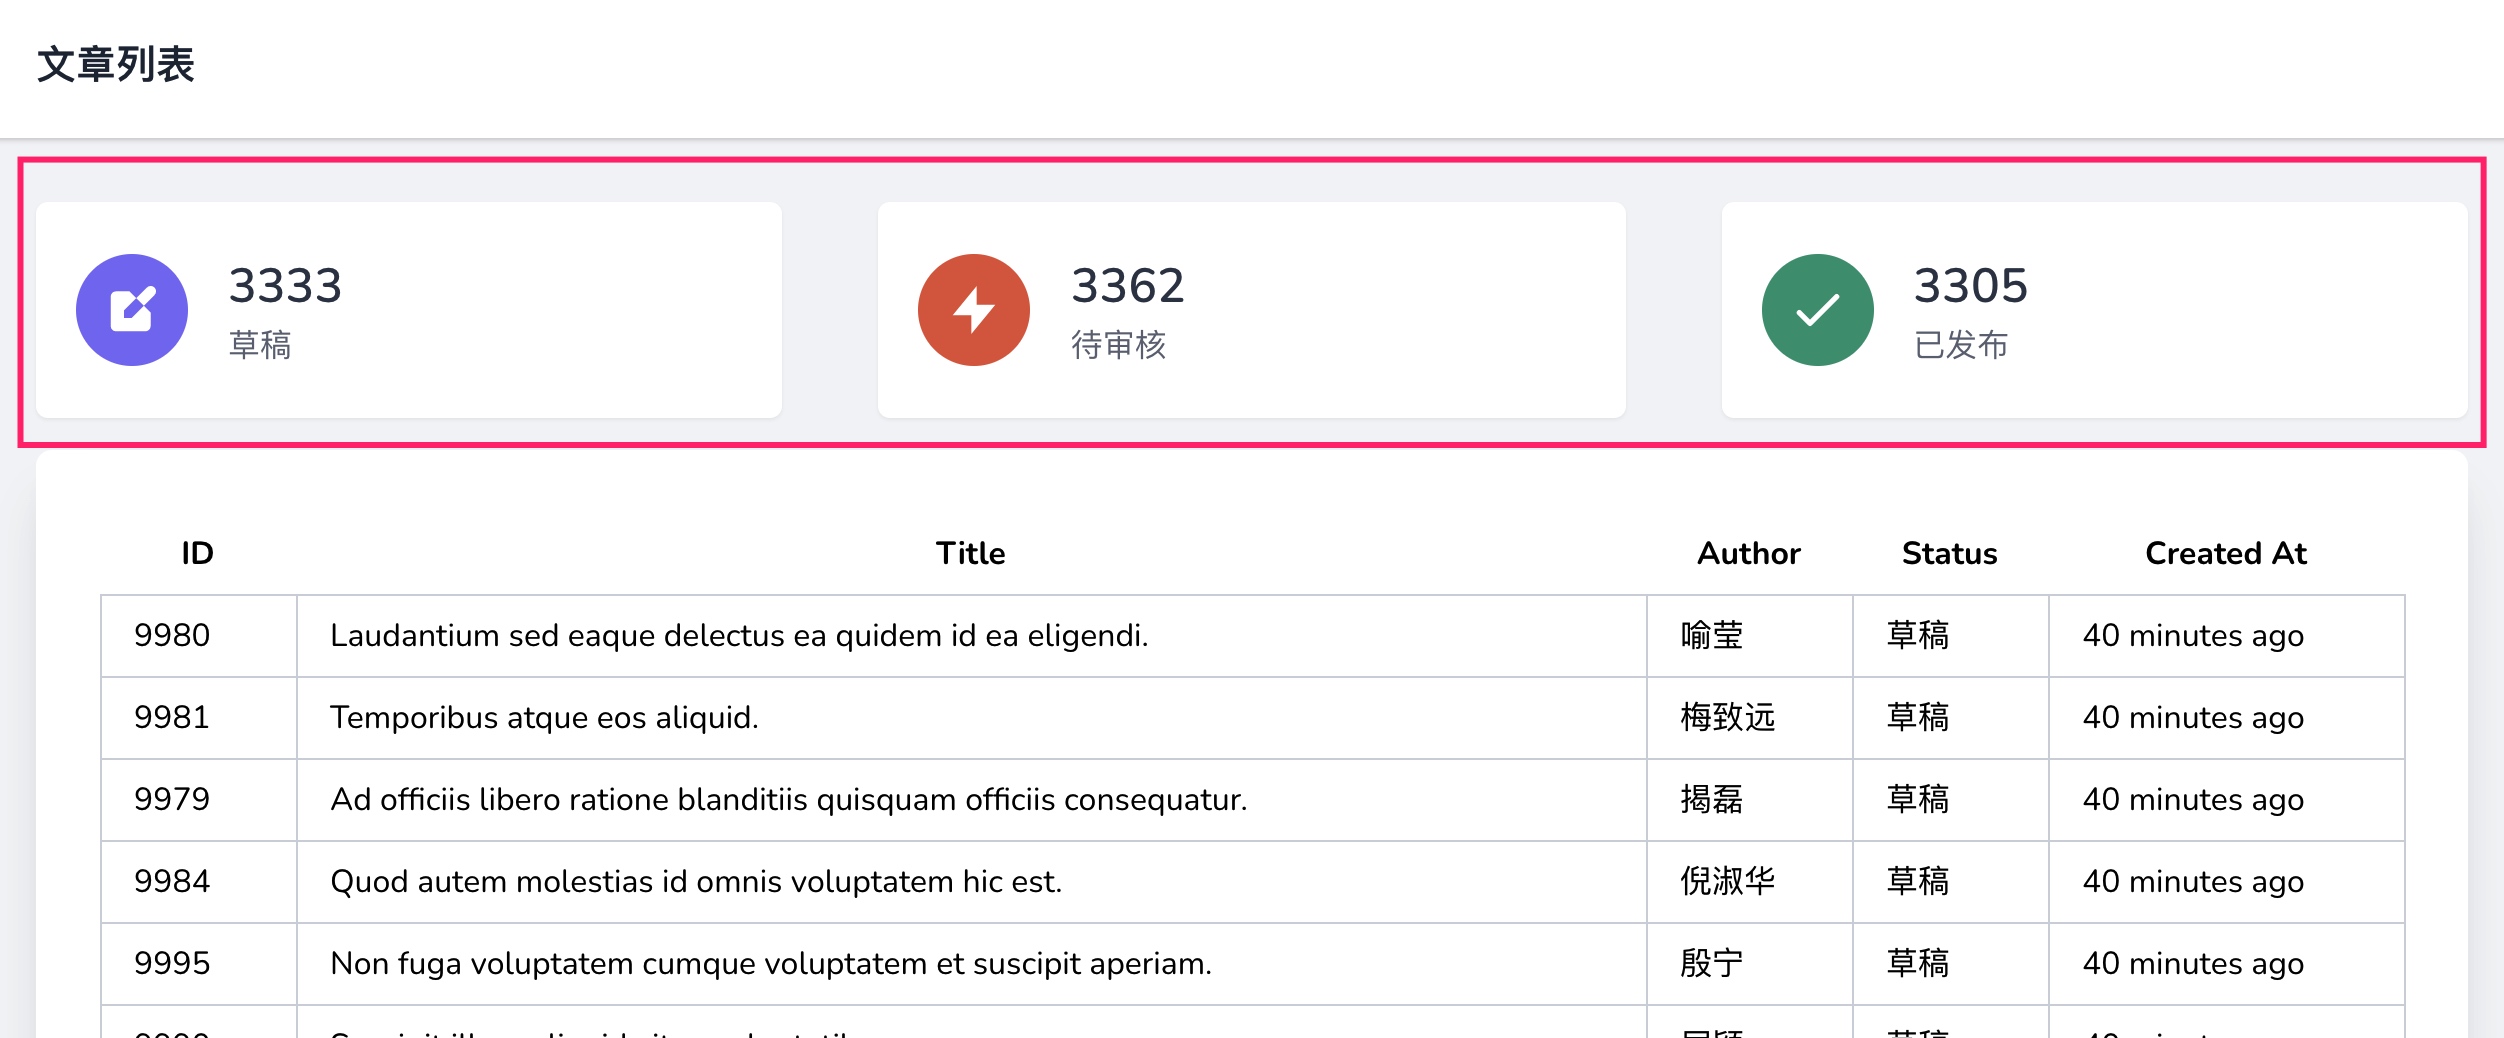
我们将以文章列表为例演示该聚合统计功能的实现和优化。
文章模型数据准备工作
开始之前,先进行文章模型数据的准备工作。
首先需要为文章表新增状态字段 status,新建一个数据库迁移文件:
php artisan make:migration alter_posts_add_status --table=posts
然后编写新增的迁移文件代码如下:
<?php

use Illuminate\Database\Migrations\Migration;
use Illuminate\Database\Schema\Blueprint;
use Illuminate\Support\Facades\Schema;

class AlterPostsAddStatus extends Migration
{
    /**
     * Run the migrations.
     *
     * @return void
     */
    public function up()
    {
        Schema::table('posts', function (Blueprint $table) {
            $table->tinyInteger('status')->unsigned()->after('user_id');
        });
    }

    /**
     * Reverse the migrations.
     *
     * @return void
     */
    public function down()
    {
        Schema::table('posts', function (Blueprint $table) {
            $table->dropColumn('status');
        });
    }
}
然后在 Post 模型类中为不同的状态值定义常量属性:
class Post extends Model
{
    use HasFactory;

    const STATUS_DRAFT = 0;   // 草稿
    const STATUS_AUDIT = 1;   // 待审核
    const STATUS_NORMAL = 2;  // 已发布

    ...
}
接下来在模型工厂 PostFactory 中定义状态字段值生成策略:
<?php

namespace Database\Factories;

use App\Models\Post;
use App\Models\User;
use Illuminate\Database\Eloquent\Factories\Factory;

class PostFactory extends Factory
{
    ...

    public function definition()
    {
        $statusMap = [Post::STATUS_DRAFT, Post::STATUS_AUDIT, Post::STATUS_NORMAL];
        return [
            'title' => $this->faker->sentence,
            'content' => $this->faker->paragraph,
            'user_id' => User::factory(),
            'status' => $this->faker->randomElement($statusMap)
        ];
    }
}
最后通过如下迁移命令重建数据表并填充伪造数据:
php artisan migrate:refresh --seed
至此,模型数据准备工作就完成了。
统计不同状态文章数量的常规实现
要实现本篇教程开头给出的不同文章状态聚合统计功能,很多开发者的第一反应可能就是根据不同状态分别使用 Eloquent 模型类提供的 count 聚合函数进行查询,对应的实现代码如下:
<?php

namespace App\Http\Controllers;

use App\Models\Post;

class PostController extends Controller
{
    public function create()
    {
        return view('post.create');
    }

    public function index()
    {
        $status = new \stdClass();
        $status->draft_count = Post::where('status', Post::STATUS_DRAFT)->count();
        $status->audit_count = Post::where('status', Post::STATUS_AUDIT)->count();
        $status->normal_count = Post::where('status', Post::STATUS_NORMAL)->count();
        $posts = Post::with('author:id,name')
            ->select(['id', 'title', 'user_id', 'created_at'])
            ->orderByDesc('created_at')
            ->paginate(100);
        return view('post.index', ['posts' => $posts, 'status' => $status]);
    }
}
然后在视图模板中编写对应的模板代码进行渲染(这里都是通过 Tailwind CSS 框架进行样式渲染):
<x-app-layout>
    <x-slot name="header">
        <h2 class="font-semibold text-xl text-gray-800 leading-tight">
            文章列表
        </h2>
    </x-slot>

    <div class="py-8">
        <div class="max-w-7xl mx-auto sm:px-6 lg:px-8">
            <!--根据文章状态进行聚合统计-->
            <div class="mb-4">
                <div class="flex flex-wrap -mx-6">
                    <div class="w-full px-6 sm:w-1/2 xl:w-1/3">
                        <div class="flex items-center px-5 py-6 shadow-sm rounded-md bg-white">
                            <div class="p-3 rounded-full bg-indigo-600 bg-opacity-75">
                                <svg class="h-8 w-8 text-white" viewBox="0 0 24 24" fill="none" xmlns="http://www.w3.org/2000/svg">
                                   <path stroke-linecap="round" stroke-linejoin="round" stroke-width="2" d="M11 5H6a2 2 0 00-2 2v11a2 2 0 002 2h11a2 2 0 002-2v-5m-1.414-9.414a2 2 0 112.828 2.828L11.828 15H9v-2.828l8.586-8.586z" fill="currentColor"/>
                                </svg>
                            </div>

                            <div class="mx-5">
                                <h4 class="text-2xl font-semibold text-gray-700">{{ $status->draft_count }}</h4>
                                <div class="text-gray-500">草稿</div>
                            </div>
                        </div>
                    </div>

                    <div class="w-full mt-6 px-6 sm:w-1/2 xl:w-1/3 sm:mt-0">
                        <div class="flex items-center px-5 py-6 shadow-sm rounded-md bg-white">
                            <div class="p-3 rounded-full bg-orange-600 bg-opacity-75">
                                <svg class="h-8 w-8 text-white" viewBox="0 0 24 24" fill="none" xmlns="http://www.w3.org/2000/svg">
                                    <path stroke-linecap="round" stroke-linejoin="round" stroke-width="2" d="M13 10V3L4 14h7v7l9-11h-7z" fill="currentColor" />
                                </svg>
                            </div>

                            <div class="mx-5">
                                <h4 class="text-2xl font-semibold text-gray-700">{{ $status->audit_count }}</h4>
                                <div class="text-gray-500">待审核</div>
                            </div>
                        </div>
                    </div>

                    <div class="w-full mt-6 px-6 sm:w-1/2 xl:w-1/3 xl:mt-0">
                        <div class="flex items-center px-5 py-6 shadow-sm rounded-md bg-white">
                            <div class="p-3 rounded-full bg-green-600 bg-opacity-75">
                                <svg class="h-8 w-8 text-white" xmlns="http://www.w3.org/2000/svg" fill="none" viewBox="0 0 24 24" stroke="currentColor">
                                    <path stroke-linecap="round" stroke-linejoin="round" stroke-width="2" d="M5 13l4 4L19 7" />
                                </svg>
                            </div>

                            <div class="mx-5">
                                <h4 class="text-2xl font-semibold text-gray-700">{{ $status->normal_count }}</h4>
                                <div class="text-gray-500">已发布</div>
                            </div>
                        </div>
                    </div>
                </div>
            </div>

            <!--文章列表数据渲染-->
            <div class="bg-white overflow-hidden shadow-xl sm:rounded-lg">
                <div class="flex justify-center">
                    <table class="w-full m-8">
                        <thead>
                        <tr>
                            <th class="px-4 py-2">ID</th>
                            <th class="px-4 py-2">Title</th>
                            <th class="px-4 py-2">Author</th>
                            <th class="px-4 py-2">Status</th>
                            <th class="px-4 py-2">Created At</th>
                        </tr>
                        </thead>
                        <tbody>
                        @foreach ($posts as $post)
                            <tr>
                                <td class="border px-4 py-2">{{ $post->id }}</td>
                                <td class="border px-4 py-2">{{ $post->title }}</td>
                                <td class="border px-4 py-2">{{ $post->author->name }}</td>
                                <td class="border px-4 py-2">{{ $post->statusLabel }}</td>
                                <td class="border px-4 py-2">{{ $post->created_at->diffForHumans() }}</td>
                            </tr>
                        @endforeach
                        </tbody>
                    </table>
                </div>

                <!--文章列表分页组件-->
                <div class="max-w-full m-8">
                    {{ $posts->links() }}
                </div>
            </div>
        </div>
    </div>
</x-app-layout>
在浏览器中刷新文章列表页,就可以看到包含聚合统计功能的文章列表页面可以正常渲染:
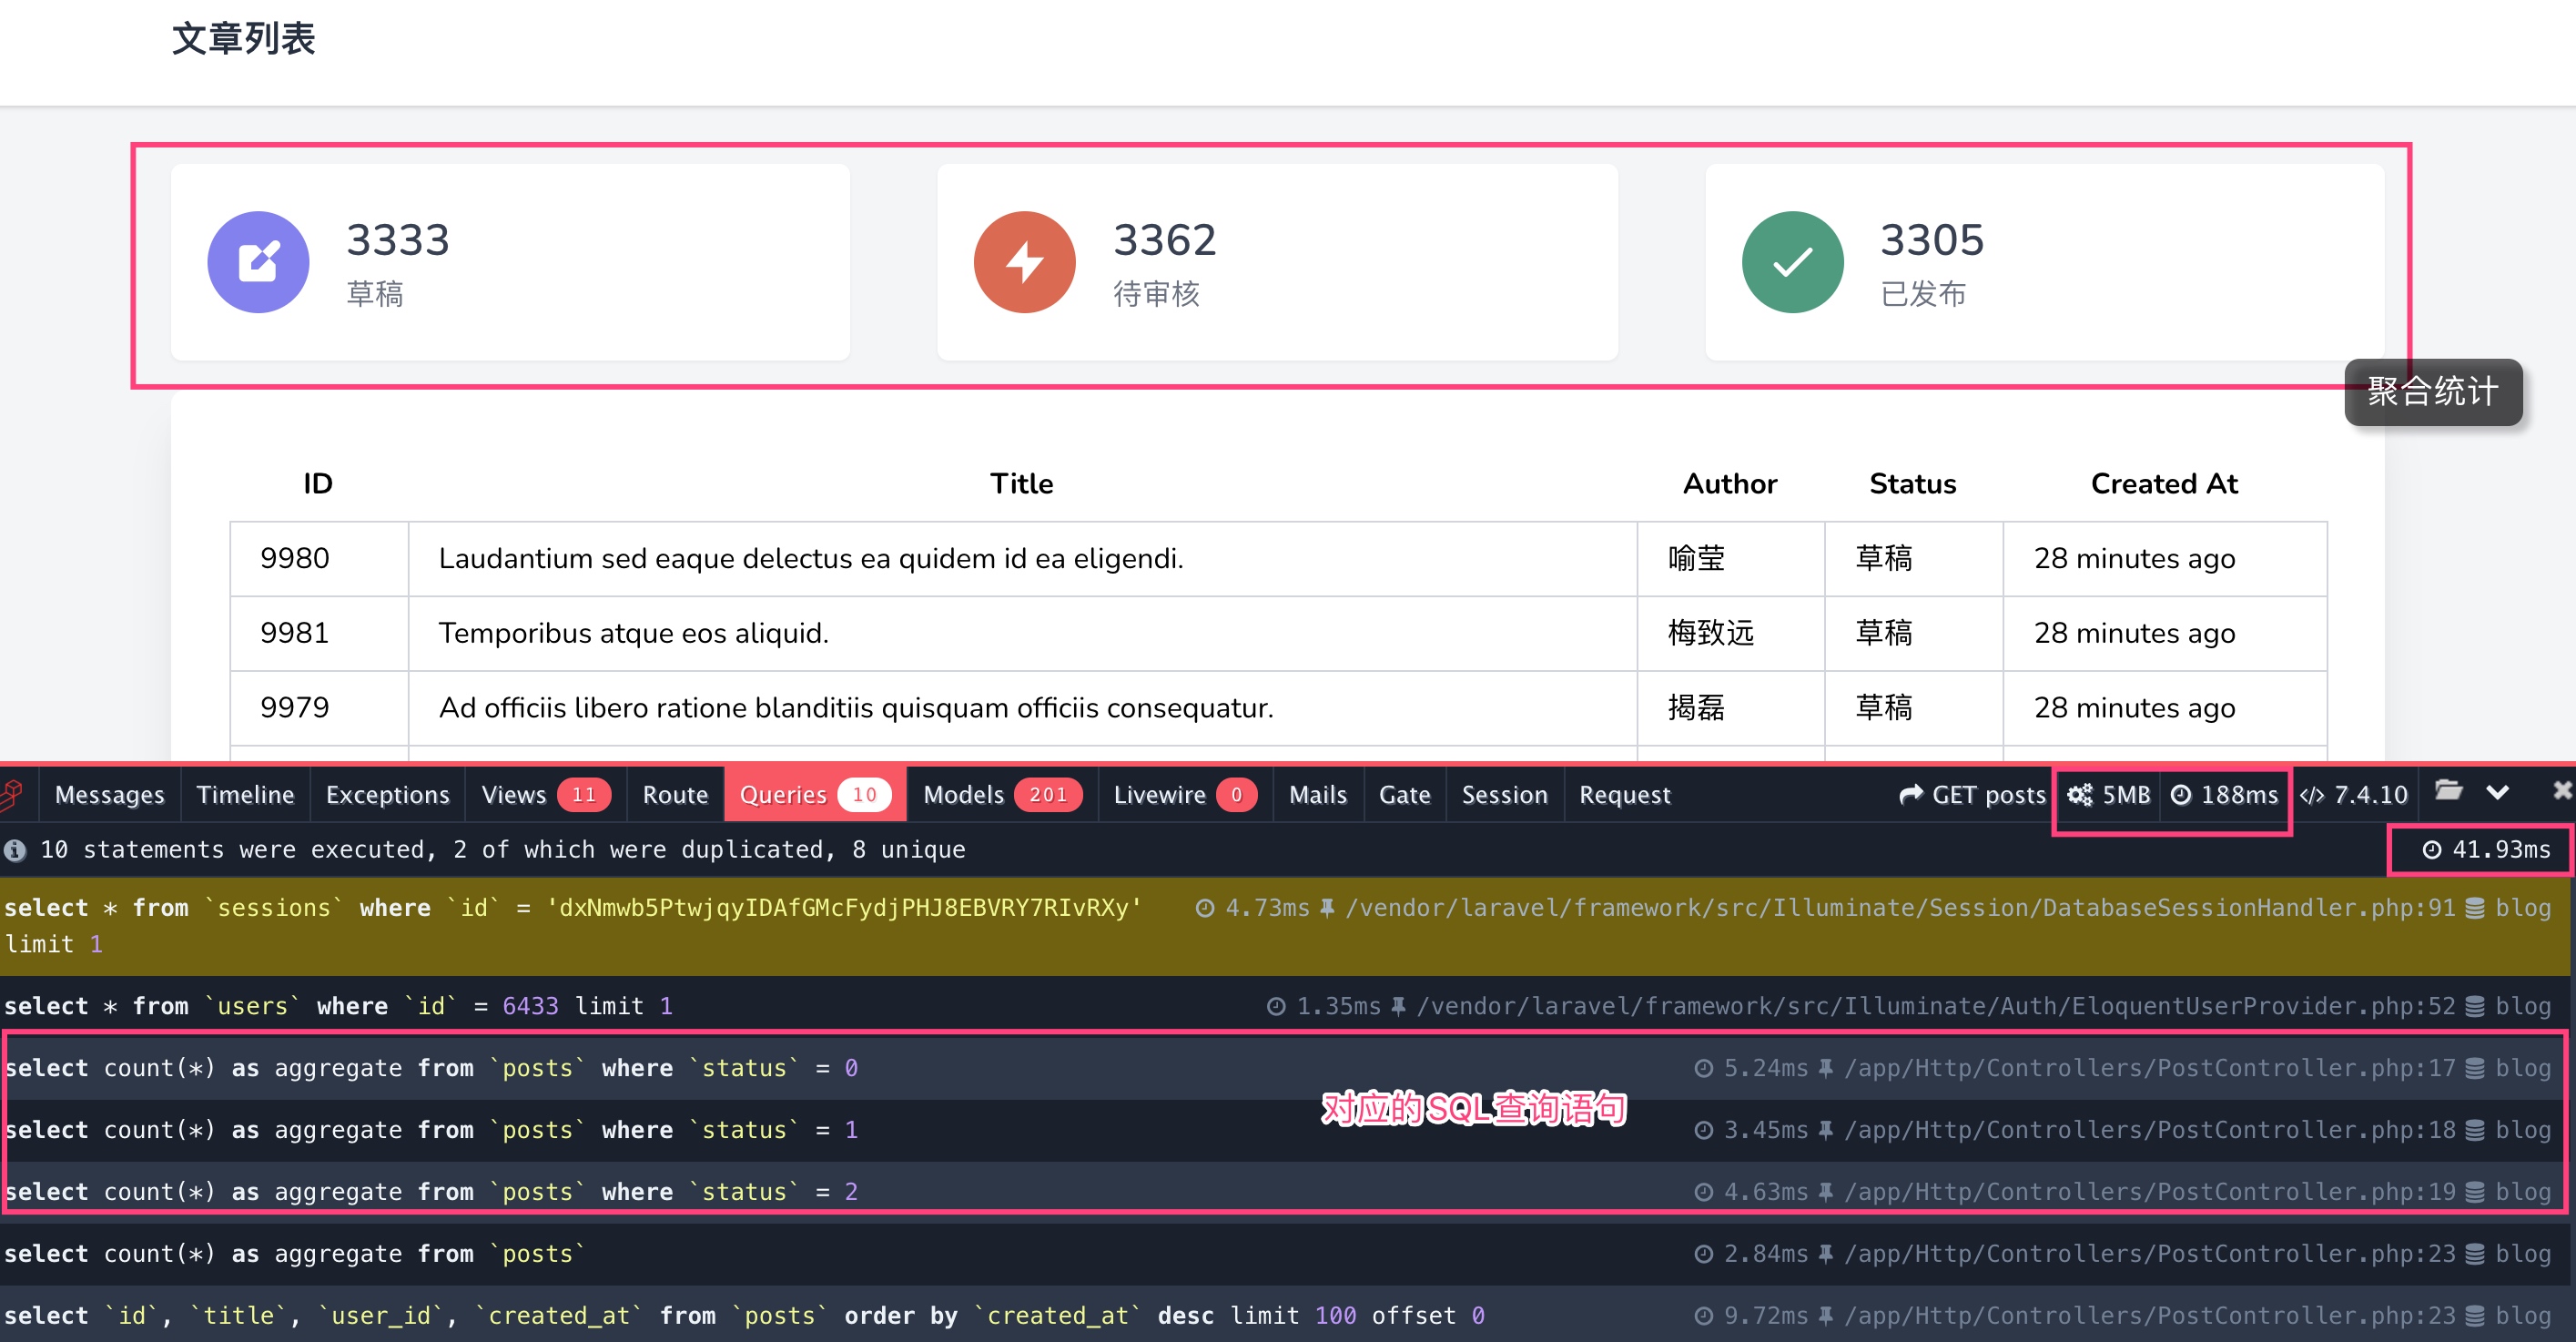
功能实现上没啥问题,但是这里通过 Laravel Debugbar 工具条可以看到聚合统计功能的实现经历了三次数据库查询,除了状态字段值不同外,整体的 SQL 查询语句语法结构完全一样,这不禁让我们联合到关联查询的「懒惰式加载」优化,那这里我们是否也可以通过将多条聚合统计查询合并为一条查询语句进行优化呢(优化思路依然秉持的是通过减少数据库查询次数)?
将多次聚合统计查询合并为一次查询
答案是可以的,在 MySQL 中,我们可以将上述三个 count 聚合查询语句合并如下这条 SQL 查询语句:
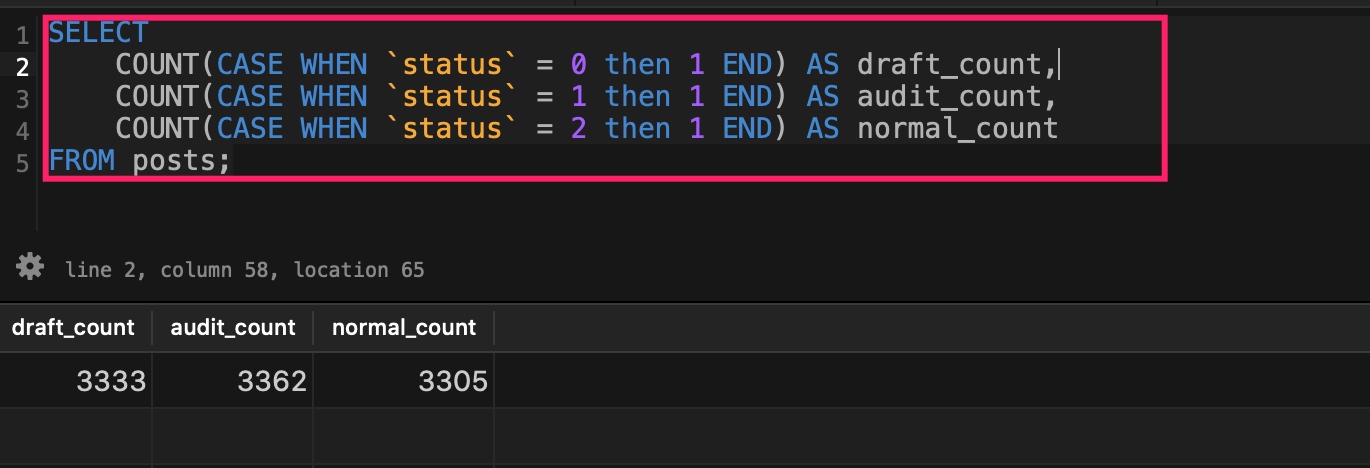
实现效果和我们分别进行聚合查询完全一样。
接下来,我们可以在 PostController 控制器的 index 方法中按照上面这条 SQL 语句对之前的聚合统计代码进行重构,由于查询字段中使用了比较复杂的 SQL 语法,这里我们需要在 Eloquent 模型类上使用 selectRaw 来指定原生的查询字段:
public function index()
{
    $status = Post::selectRaw('COUNT(CASE WHEN `status` = 0 then 1 END) AS draft_count')
        ->selectRaw('COUNT(CASE WHEN `status` = 1 then 1 END) AS audit_count')
        ->selectRaw('COUNT(CASE WHEN `status` = 2 then 1 END) AS normal_count')
        ->first();

    ...

    return view('post.index', ['posts' => $posts, 'status' => $status]);
}
刷新文章列表,所有数据显示和之前完全一样:
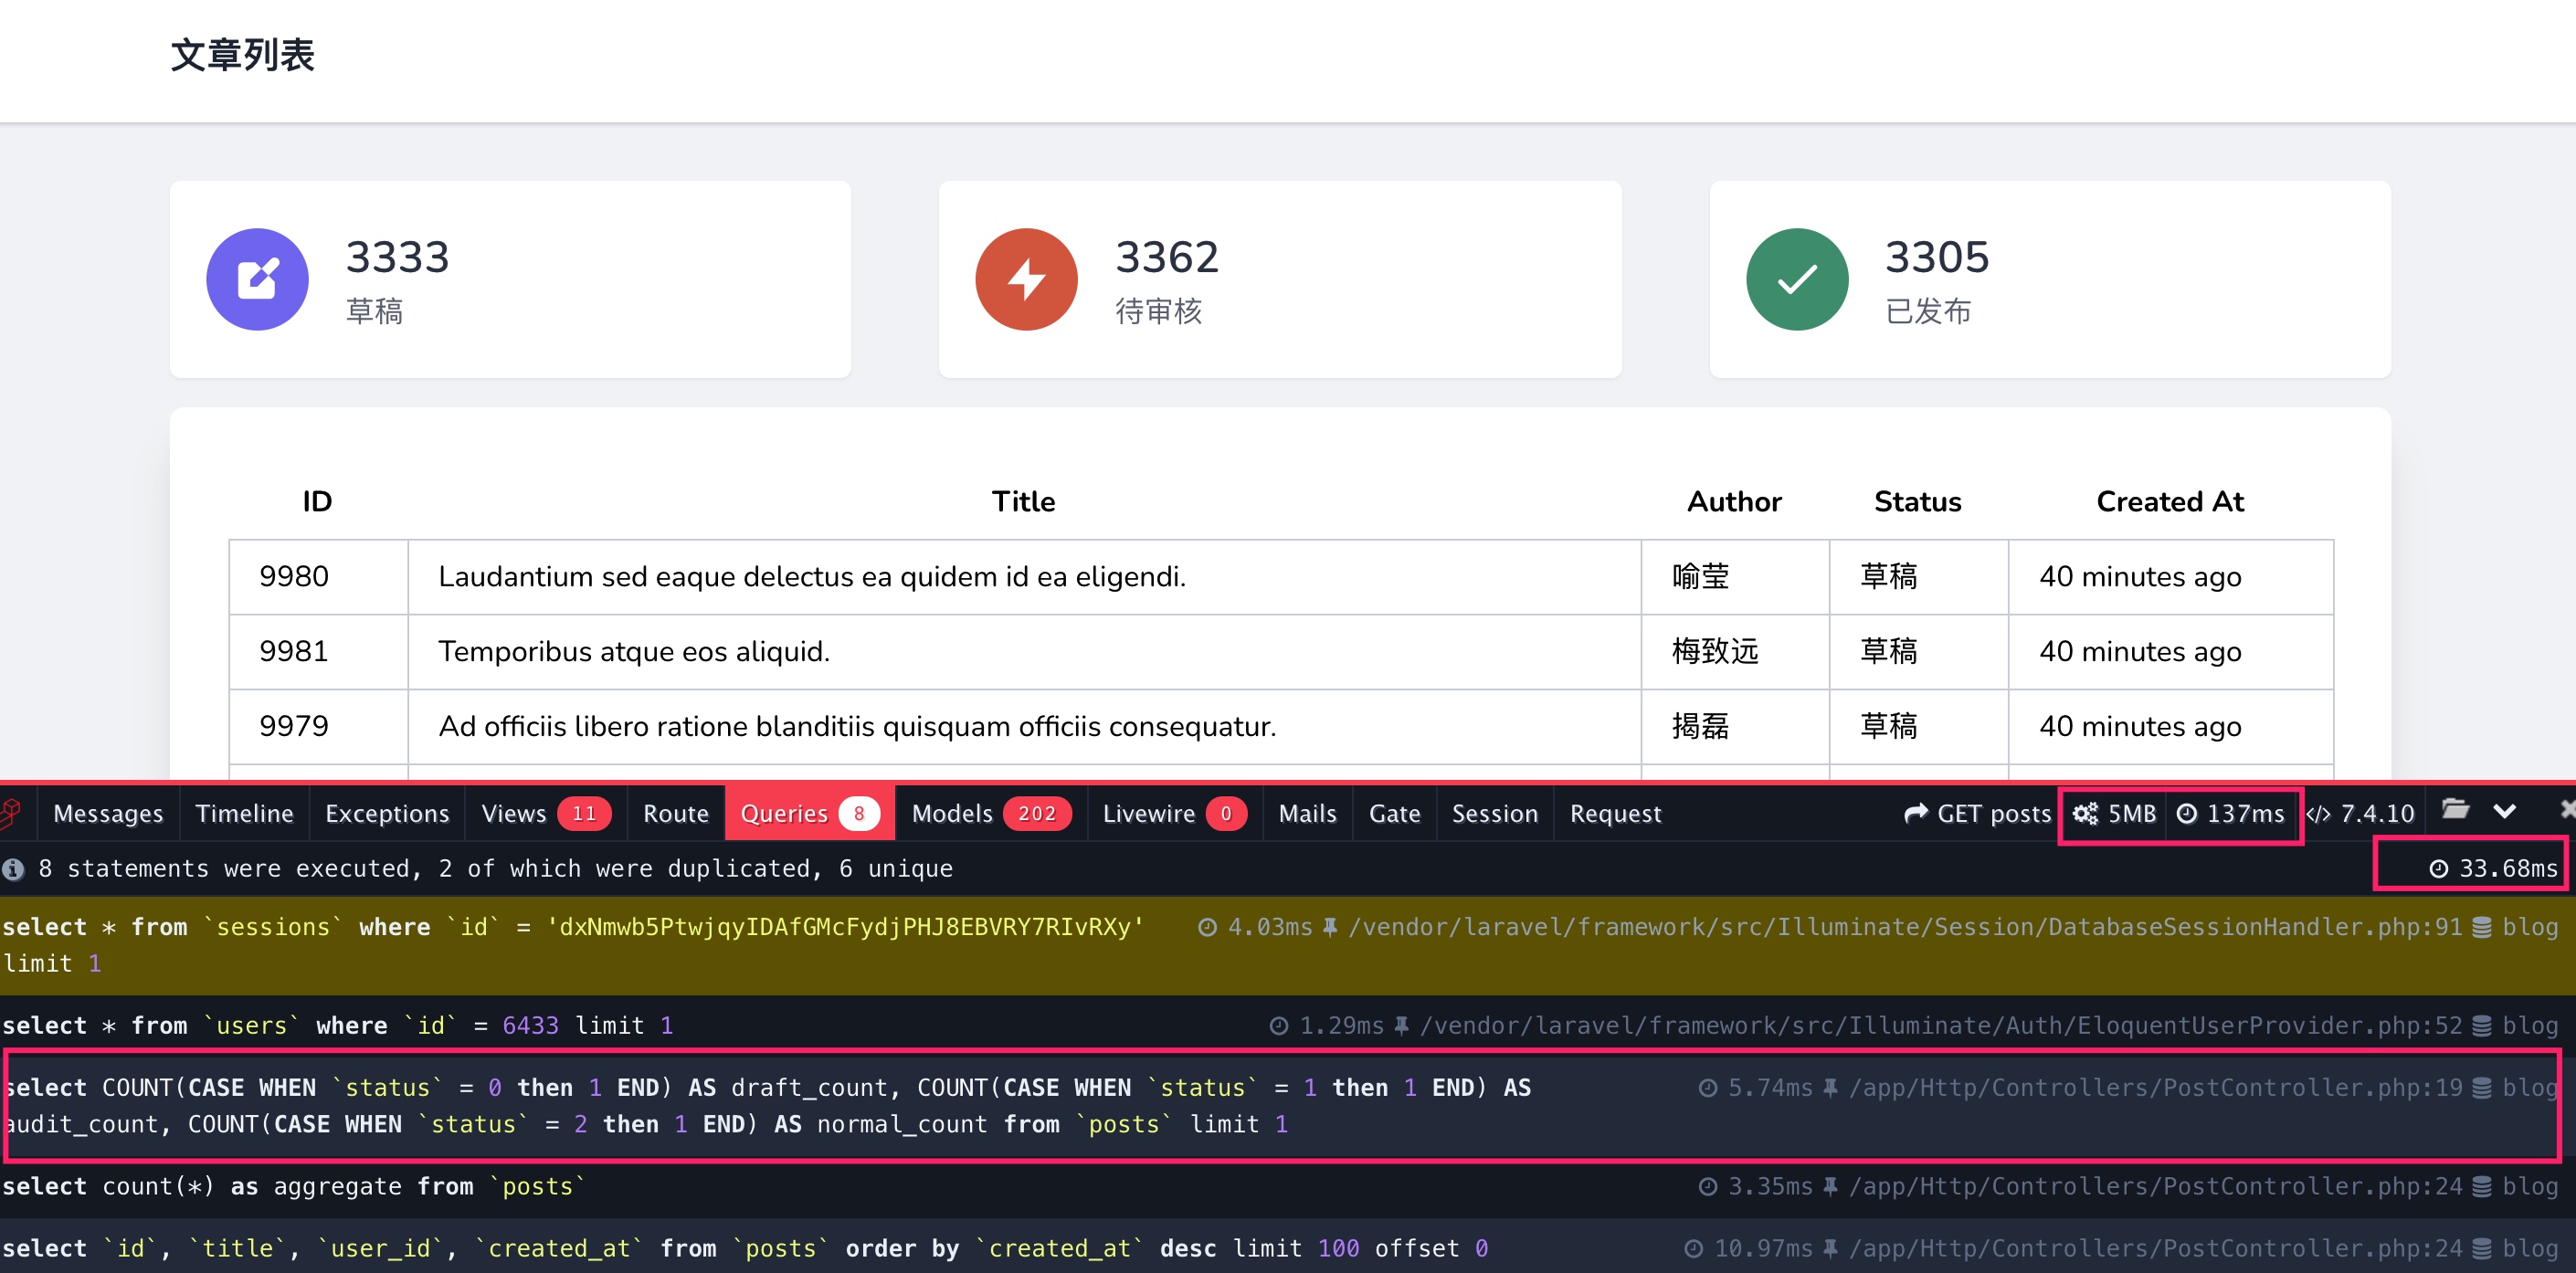
并且通过 Laravel Debugbar 工具条的 Queries 标签页,我们可以看到,由于数据库查询次数减少,对应的数据库查询时间相较之前有了明显的降低。
注:对于这样的查询性能优化场景,有些新手可能第一反应就是对
status字段加索引,但是看过前面数据库索引篇的同学应该知道,对于这种字段值重复度很高的状态字段,是不适合添加索引的,因为正常情况下,文章表 99% 以上的记录可能都是「已发布」状态,这样一来,当我们通过设置了索引的status字段值筛选「已发布」文章时,和全表扫描并没有什么区别。
小结
在中小型 Web 应用中,合理地设置字段索引、减少数据库查询次数(通过缓存系统缓存应用热数据本质上也归属于这一类的优化思路)、指定真正用到的查询字段是数据库查询性能优化的入门三板斧,基本上就足以应付日常的负载了。
通过前面这三篇教程的演示,想必你已经学会了如何结合 Laravel Debugbar 工具灵活运用前面介绍的高性能 MySQL 理论知识在本地对应用性能进行优化了,下篇教程开始,学院君将更深度地使用 Laravel 本身提供的一些 Eloquent 功能特性,继续沿着三板斧的思路对关联查询和排序里的更多业务场景进行性能优化。
2 条评论
Trying to get property 'name' of non-object(View: .../resources/views/posts/index.blade.php)
statusLabel 代码里面好像没有处理吧....