Laravel 后端博客文章数据相关 API 接口提供
在前两篇教程中,我们已经为博客单页面应用准备好了前端路由和页面组件,在这篇教程中,我们将通过 Laravel 后端 API 接口提供文章数据来渲染前端页面。
模型类和数据库迁移
开始之前,先启动 MySQL 数据库,创建本项目对应的数据库 demo_spa,并在 .env 配置好数据库连接信息:
DB_CONNECTION=mysql
DB_HOST=127.0.0.1
DB_PORT=3306
DB_DATABASE=demo_spa
DB_USERNAME=root
DB_PASSWORD=root
接下来,我们使用 Laravel Artisan 命令为博客文章创建模型类、数据库迁移文件和控制器:
php artisan make:model Post -mc
创建完成后,编写刚刚生成的 posts 表对应的数据库迁移类代码如下:
<?php

use Illuminate\Database\Migrations\Migration;
use Illuminate\Database\Schema\Blueprint;
use Illuminate\Support\Facades\Schema;

class CreatePostsTable extends Migration
{
    /**
     * Run the migrations.
     *
     * @return void
     */
    public function up()
    {
        Schema::create('posts', function (Blueprint $table) {
            $table->id();
            $table->string('title');
            $table->string('summary');
            $table->text('content');
            $table->string('image_url');
            $table->smallInteger('category_id')->unsigned()->default(0)->index();
            $table->bigInteger('user_id')->unsigned()->default(0)->index();
            $table->timestamps();
        });
    }

    /**
     * Reverse the migrations.
     *
     * @return void
     */
    public function down()
    {
        Schema::dropIfExists('posts');
    }
}
在 posts 表中,定义了两个逻辑外键 —— user_id 和 category_id,分别对应用户 ID 和分类 ID(用户和文章、分类和文章都是一对多关联),由于后续进行数据库关联查询时不可避免地要使用这两个外键字段,所以我们为其设置了索引。
由于 Laravel 默认已经包含了用户模型类和数据表迁移文件,所以我们只需要再创建分类模型类和数据库迁移文件即可:
php artisan make:model Category -m
编写分类表对应的数据库迁移类代码如下:
<?php

use Illuminate\Database\Migrations\Migration;
use Illuminate\Database\Schema\Blueprint;
use Illuminate\Support\Facades\Schema;

class CreateCategoriesTable extends Migration
{
    /**
     * Run the migrations.
     *
     * @return void
     */
    public function up()
    {
        Schema::create('categories', function (Blueprint $table) {
            $table->smallIncrements('id');
            $table->string('name', 30)->unique();
            $table->timestamps();
        });
    }

    /**
     * Reverse the migrations.
     *
     * @return void
     */
    public function down()
    {
        Schema::dropIfExists('categories');
    }
}
只包含了分类 ID、分类名称、创建和更新时间,非常简单,对于个人博客应用而言,分类数量一般不会过百,所以这里使用了 small integer 作为主键 ID 类型降低空间占用,分类名是唯一的,所以设置了唯一索引。
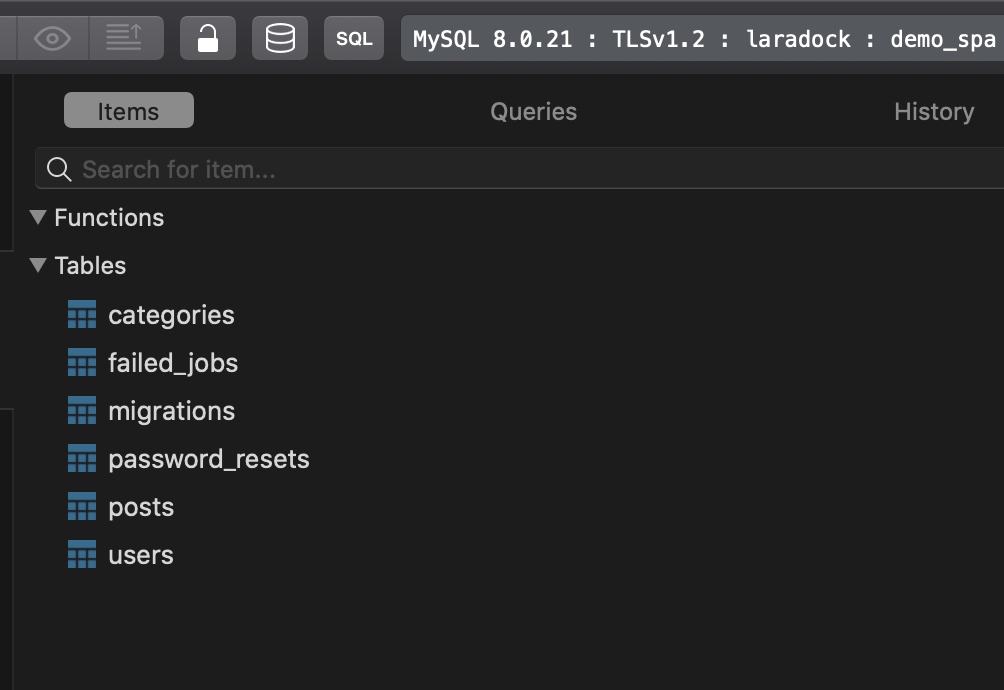
运行 php artisan migrate 命令让数据库迁移生效,这样,就可以在数据库中看到对应的数据表都已经生成了:
关联关系和 API 接口编写
接下来,我们在文章、分类、用户模型类中定义它们之间的关联关系。
首先是 Post 模型类,它与分类和用户模型之间是逆向一对多归属关联关系:
<?php

namespace App\Models;

use Illuminate\Database\Eloquent\Factories\HasFactory;
use Illuminate\Database\Eloquent\Model;

class Post extends Model
{
    use HasFactory;

    protected $fillable = ['title', 'summary', 'content', 'image_url', 'category_id'];

    public function category()
    {
        return $this->belongsTo(Category::class);
    }

    public function author()
    {
        return $this->belongsTo(User::class, 'user_id');
    }
}
接着在 Category 模型类中定义其与 Post 模型类的一对多关联:
<?php

namespace App\Models;

use Illuminate\Database\Eloquent\Factories\HasFactory;
use Illuminate\Database\Eloquent\Model;

class Category extends Model
{
    use HasFactory;

    public function posts()
    {
        return $this->hasMany(Post::class);
    }
}
以及在 User 模型类中定义它与 Post 模型类的一对多关联:
public function posts()
{
    return $this->hasMany(Post::class);
}
定义好这些关联关系后,就可以在 PostController 中编写返回博客首页、分类列表页和文章详情页数据的接口方法了:
<?php

namespace App\Http\Controllers;

use App\Models\Category;
use App\Models\Post;

class PostController extends Controller
{
    // 博客首页
    public function index()
    {
        return Post::with(['author:id,name,email', 'category'])
            ->select(['id', 'title', 'summary', 'image_url', 'category_id', 'user_id', 'created_at'])
            ->orderByDesc('id')->paginate();
    }

    // 分类页面
    public function category($name)
    {
        $category = Category::whereName($name)->firstOrFail();
        $posts = Post::with(['author:id,name,email'])
            ->where('category_id', $category->id)
            ->orderByDesc('id')
            ->paginate(10);
        return $posts;
    }

    // 文章详情页
    public function show(Post $post)
    {
        return $post->load(['author:id,name,email', 'category']);
    }
}
非常简单,其中使用了渴求式加载获取关联模型数据和分页方法获取分页器实例(列表页数据需要分页获取)。
这样一来,就初步完成了后端文章接口的编写工作,当然,还需要在 routes/api.php 中注册相应的 API 路由才能被外部访问:
use App\Http\Controllers\PostController;
Route::get('/posts', [PostController::class, 'index']);
Route::get('/posts/category/{name}', [PostController::class, 'category']);
// 使用隐式路由模型绑定获取文章详情
Route::get('/posts/{post}', [PostController::class, 'show']);
通过模型工厂填充测试数据
为了测试上述博客文章 API 接口是否可以正常访问,我们来编写模型工厂和数据库填充器填充测试数据。
Laravel 默认已经提供了用户类对应的模型工厂,我们只需要编写分类模型和文章模型对应的模型工厂即可。
首先是 Category 模型工厂,使用如下 Artisan 命令创建对应的模型工厂类:
php artisan make:factory CategoryFactory
然后编写 CategoryFactory 类代码如下:
<?php

namespace Database\Factories;

use App\Models\Category;
use Illuminate\Database\Eloquent\Factories\Factory;

class CategoryFactory extends Factory
{
    /**
     * The name of the factory's corresponding model.
     *
     * @var string
     */
    protected $model = Category::class;

    /**
     * Define the model's default state.
     *
     * @return array
     */
    public function definition()
    {
        return [
            'name' => $this->faker->unique()->word
        ];
    }
}
分类名是唯一的,所以获取「伪造的」分类名之前调用了
unique函数。
使用同样的步骤创建 Post 模型工厂类:
php artisan make:factory PostFactory
编写对应的模型工厂代码如下:
<?php

namespace Database\Factories;

use App\Models\Category;
use App\Models\Post;
use App\Models\User;
use Illuminate\Database\Eloquent\Factories\Factory;

class PostFactory extends Factory
{
    /**
     * The name of the factory's corresponding model.
     *
     * @var string
     */
    protected $model = Post::class;

    /**
     * Define the model's default state.
     *
     * @return array
     */
    public function definition()
    {
        return [
            'title' => rtrim($this->faker->sentence, '.'),
            'summary' => $this->faker->text,
            'content' => $this->faker->paragraphs(3, true),
            'user_id' => User::factory(),
            'category_id' => Category::factory(),
            'image_url' => $this->faker->imageUrl()
        ];
    }
}
文章表字段较多,所以更复杂一些,具体的伪造字段生成逻辑可以通过结合官方文档和查看对应字段源码了解,关联字段可以直接通过调用关联模型的工厂方法生成对应的模型后再返回主键 ID 作为对应的字段值。
最后,我们还需要编写一个数据库填充器,组合上述模型工厂生成测试数据:
php artisan make:seeder BlogSeeder
编写这个填充器类 BlogSeeder 的实现代码如下:
<?php

namespace Database\Seeders;

use App\Models\Category;
use App\Models\Post;
use App\Models\User;
use Illuminate\Database\Seeder;

class BlogSeeder extends Seeder
{
    /**
     * Run the database seeds.
     *
     * @return void
     */
    public function run()
    {
        // 开始之前先清空相关数据表
        User::truncate();
        Category::truncate();
        Post::truncate();

        // 创建一个测试用户
        $user = User::factory([
            'name' => '测试账号',
            'email' => 'test@xueyuanjun.com',
        ])->create();

        // 创建三个测试分类
        $cnames = ['PHP', 'Golang', 'Javascript'];
        foreach ($cnames as $cname) {
            $category = Category::factory(['name' => $cname])->create();
            // 为每个分类创建 100 篇文章
            Post::factory([
                    'category_id' => $category->id,
                    'user_id' => $user->id
                ])
                ->count(100)
                ->create();
        }
    }
}
具体含义在注释里解释地很清楚了,运行下面这个 Artisan 命令通过伪造数据填充相关数据表:
php artisan db:seed --class=BlogSeeder
访问博客文章 API 接口
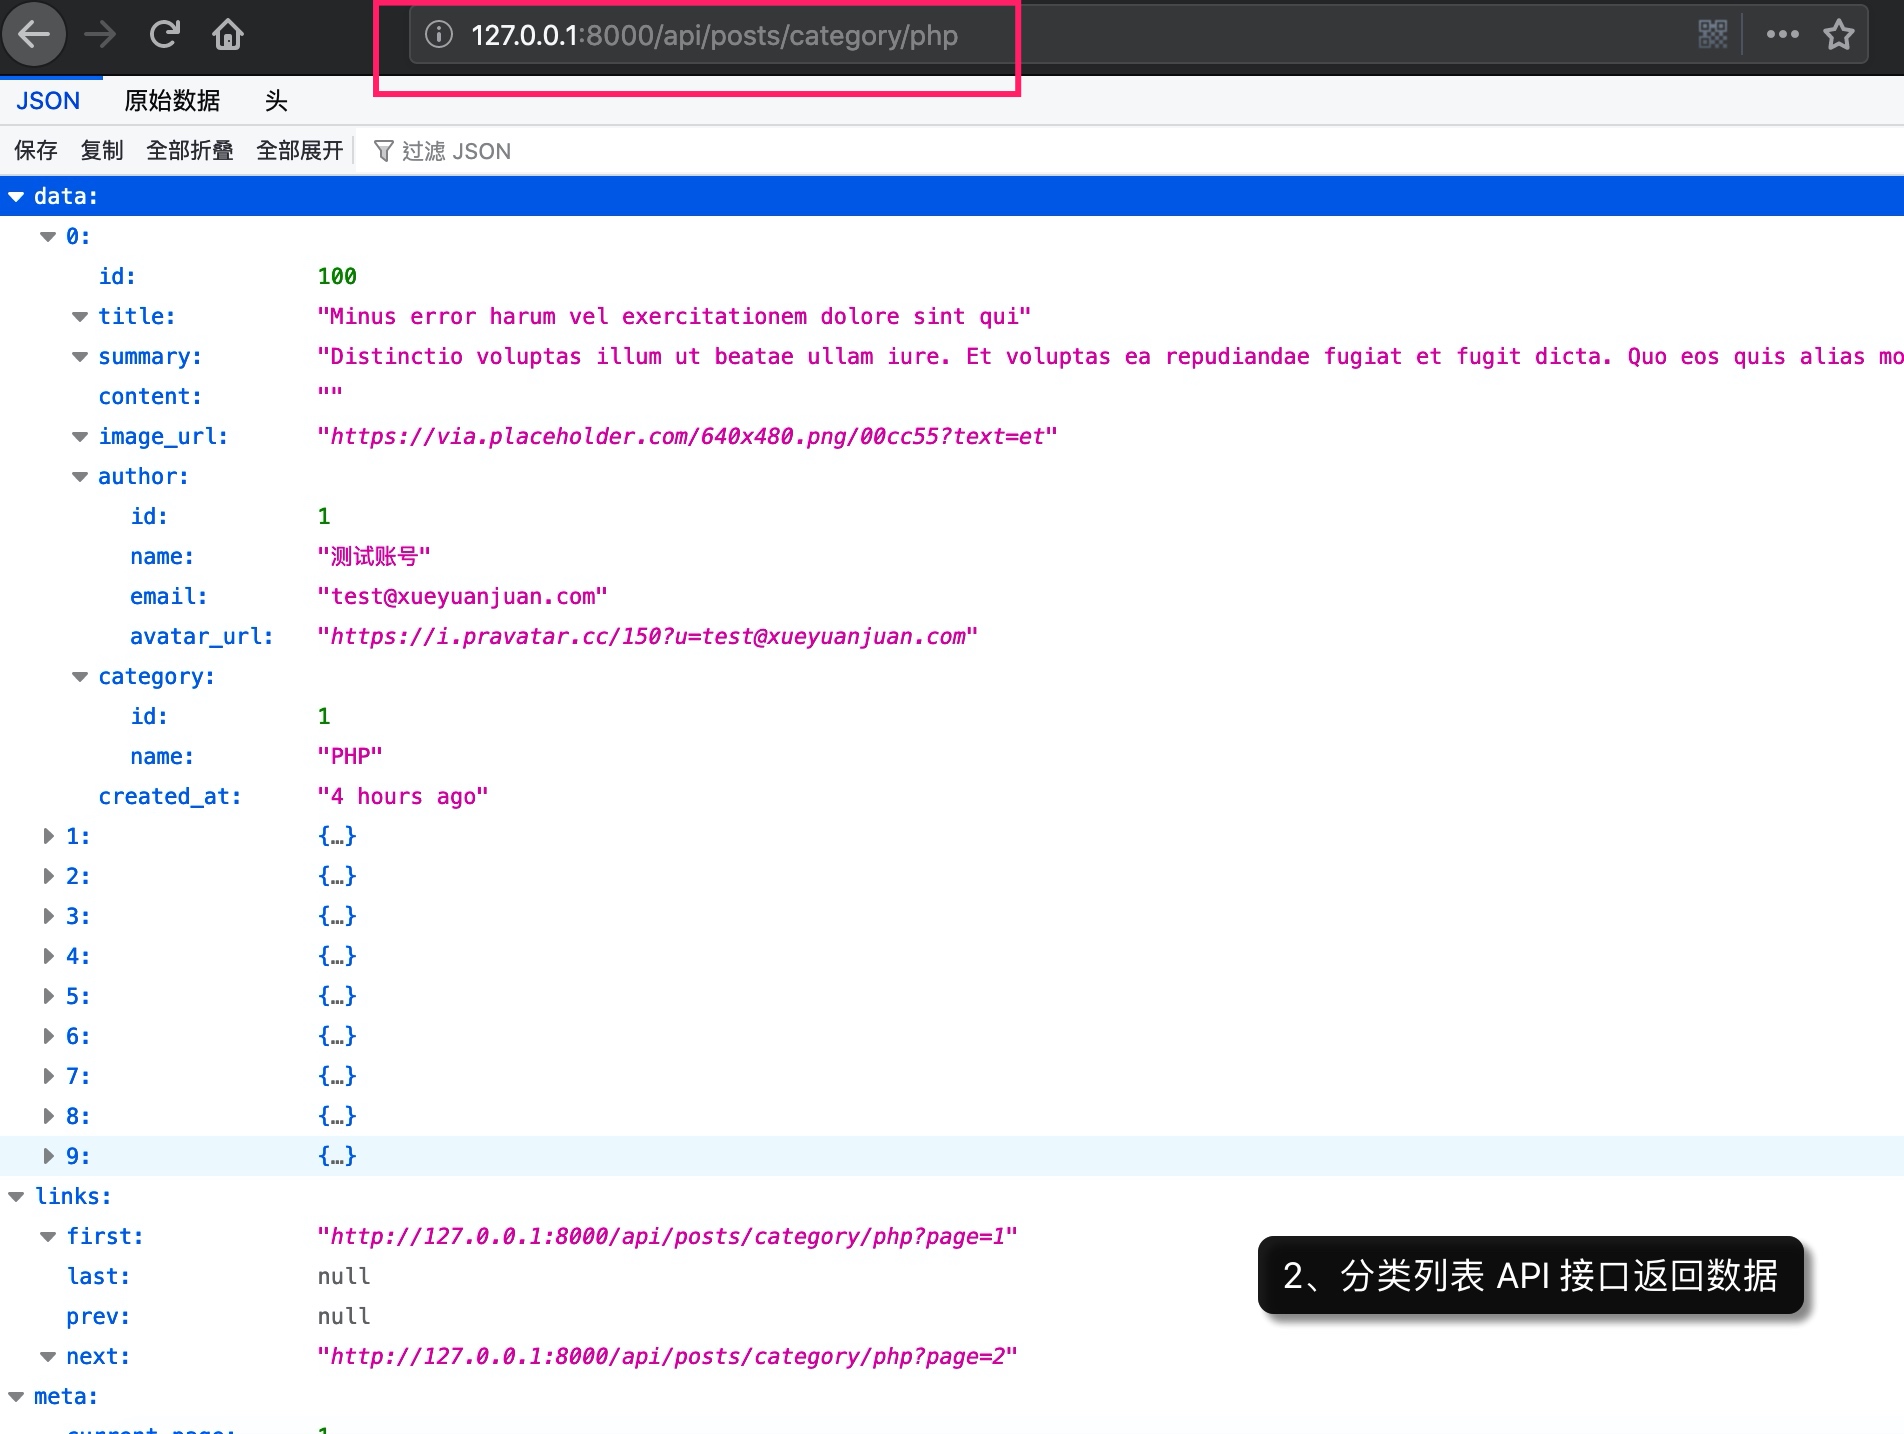
你可以去 demo_spa 数据库验证对应的数据表是否已经成功填充数据,然后在浏览器中访问博客文章 API 接口验证这些接口是否可以正常工作并返回正确的接口数据:
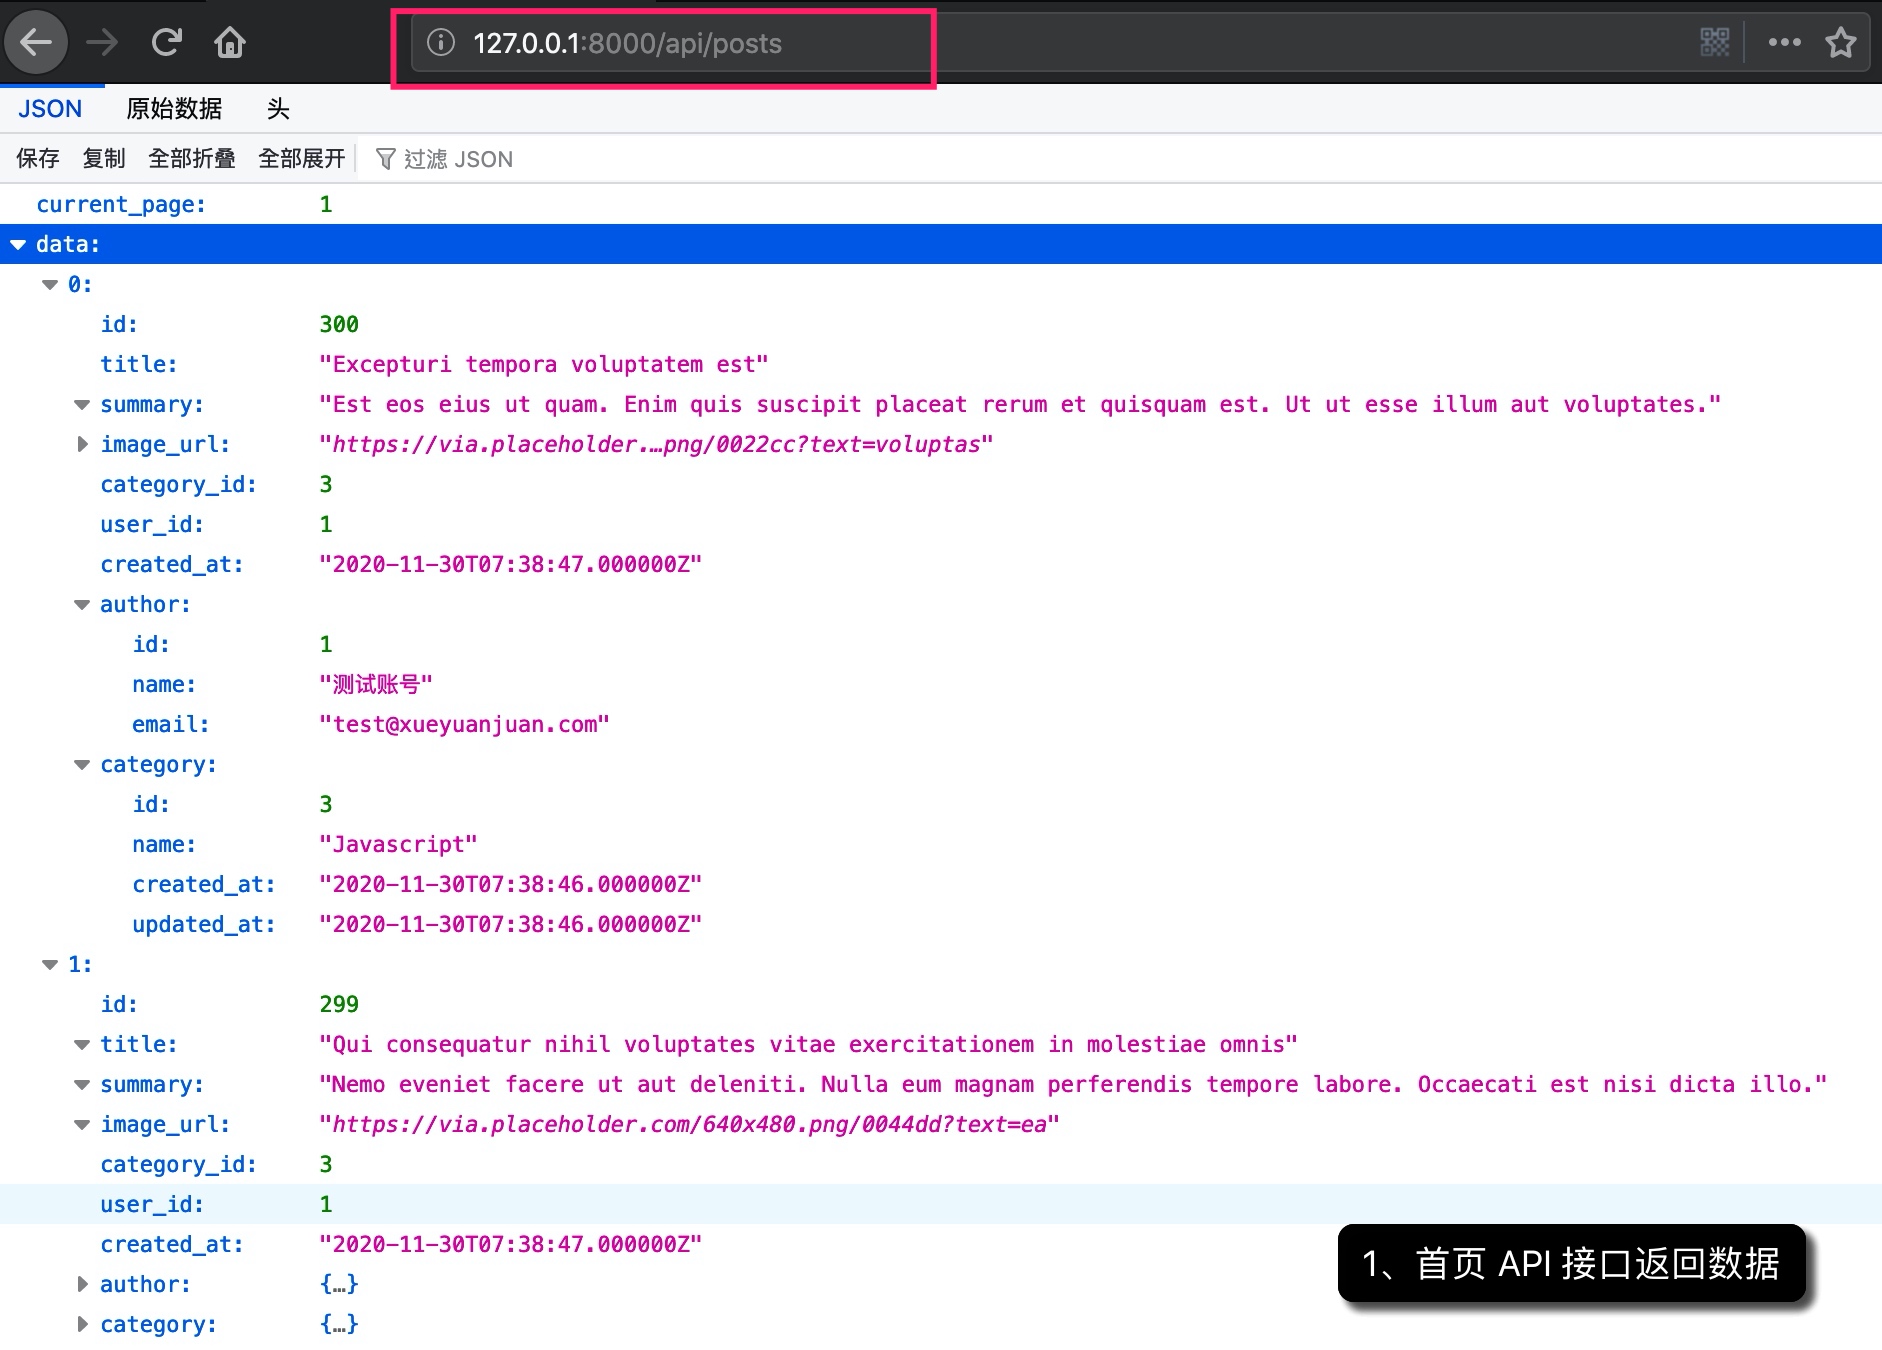


可以看到接口都可以正常工作并返回正确的数据。
不过还有一点问题,就是不同的接口返回的数据格式不统一,列表页分页器返回的数据包装在 data 字段里,而详情页直接则返回所有接口数据,这会给前端接口调用者造成困扰。
另外,有些接口字段值返回给调用方之后,需要进行二次处理,比如时间、用户头像、文章详情等,我们可以在后端进行一致性处理后返回给前端,让他们拿到之后可以直接用,降低客户端处理成本和不同端处理风格不统一的问题。
引入 API 资源类处理接口数据格式
以上问题可以通过 Laravel 提供的 API 资源类解决。
我们通过如下 Artisan 命令为接口返回的所有资源(模型类)创建对应的 API 资源类:
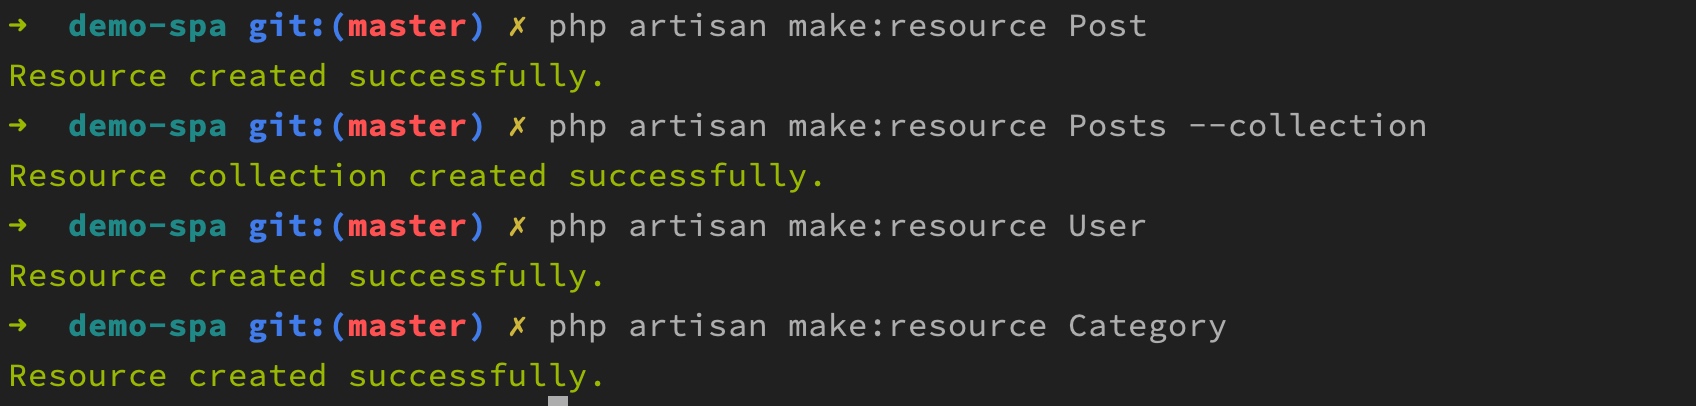
其中文章资源还需要处理文章列表,所以创建了对应的 API 资源集合类。
用户和分类资源都是嵌套在文章资源里的,所以我们化繁为简,逐个拆解,先编写用户资源类:
<?php

namespace App\Http\Resources;

use Illuminate\Http\Resources\Json\JsonResource;

class User extends JsonResource
{
    /**
     * Transform the resource into an array.
     *
     * @param  \Illuminate\Http\Request  $request
     * @return array
     */
    public function toArray($request)
    {
        return [
            'id' => $this->id,
            'name' => $this->name,
            'email' => $this->email,
            'avatar_url' => 'https://i.pravatar.cc/150?u=' . $this->email
        ];
    }
}
在这里,我们仅处理并返回用户 ID、用户名、邮箱和头像链接字段(使用 pravatar.cc 网站提供的头像生成服务为用户生成唯一头像)。
再编写分类资源类代码:
<?php

namespace App\Http\Resources;

use Illuminate\Http\Resources\Json\JsonResource;

class Category extends JsonResource
{
    /**
     * Transform the resource into an array.
     *
     * @param  \Illuminate\Http\Request  $request
     * @return array
     */
    public function toArray($request)
    {
        return [
            'id' => $this->id,
            'name' => $this->name
        ];
    }
}
我们仅返回了分类 ID 和分类名称,时间相关的字段舍弃掉,反正也没有用到。
最后,再来编写文章资源类处理代码:
<?php

namespace App\Http\Resources;

use GrahamCampbell\Markdown\Facades\Markdown;
use Illuminate\Http\Resources\Json\JsonResource;

class Post extends JsonResource
{
    /**
     * Transform the resource into an array.
     *
     * @param  \Illuminate\Http\Request  $request
     * @return array
     */
    public function toArray($request)
    {
        return [
            'id' => $this->id,
            'title' => $this->title,
            'summary' => $this->summary,
            'content' => empty($this->content) ? '' : Markdown::convertToHtml($this->content),
            'image_url' => $this->image_url,
            'author' => User::make($this->author),
            'category' => Category::make($this->category),
            'created_at' => $this->created_at->diffForHumans()
        ];
    }
}
这里我们对文章详情字段值做了 Markdown 解析(如果有的话,这里使用了 Laravel-Markdown 扩展包提供的门面方法),对文章创建时间进行了转化,对于嵌套的关联模型,则基于对应的模型资源类来处理这些模型实例即可。
此外,还要编写文章资源集合类,很简单,只需要通过 $collects 属性指定集合中每个元素对应的资源处理类即可,这里显然是 Post 资源类:
<?php

namespace App\Http\Resources;

use Illuminate\Http\Resources\Json\ResourceCollection;

class Posts extends ResourceCollection
{
    public $collects = Post::class;

    /**
     * Transform the resource collection into an array.
     *
     * @param  \Illuminate\Http\Request  $request
     * @return array
     */
    public function toArray($request)
    {
        return parent::toArray($request);
    }
}
编写好所有的 API 资源类处理代码之后,在 PostController 中使用相应的资源类来包装之前返回的接口数据即可,Laravel 会自动按照资源类中定义的处理方法对接口数据进行统一处理(这可以算作是 PHP 不支持注解的情况下实现的装饰器模式,如果通过注解实现的话,更加简洁优雅):
<?php

namespace App\Http\Controllers;

use App\Models\Category;
use App\Models\Post;
use App\Http\Resources\Post as PostResource;
use App\Http\Resources\Posts as PostCollection;

class PostController extends Controller
{
    // 博客首页
    public function index()
    {
        return new PostCollection(
            Post::with(['author:id,name,email', 'category'])
            ->select(['id', 'title', 'summary', 'image_url', 'category_id', 'user_id', 'created_at'])
            ->orderByDesc('id')
            ->simplePaginate(10)
        );
    }

    // 分类页面
    public function category($name)
    {
        $category = Category::whereName($name)->firstOrFail();
        return new PostCollection(
            Post::with(['author:id,name,email'])
            ->select(['id', 'title', 'summary', 'image_url', 'category_id', 'user_id', 'created_at'])
            ->where('category_id', $category->id)
            ->orderByDesc('id')
            ->simplePaginate(10)
        );
    }

    // 文章详情页
    public function show(Post $post)
    {
        return new PostResource(
            $post->load(['author:id,name,email', 'category'])
        );
    }
}
再次访问博客文章 API 接口
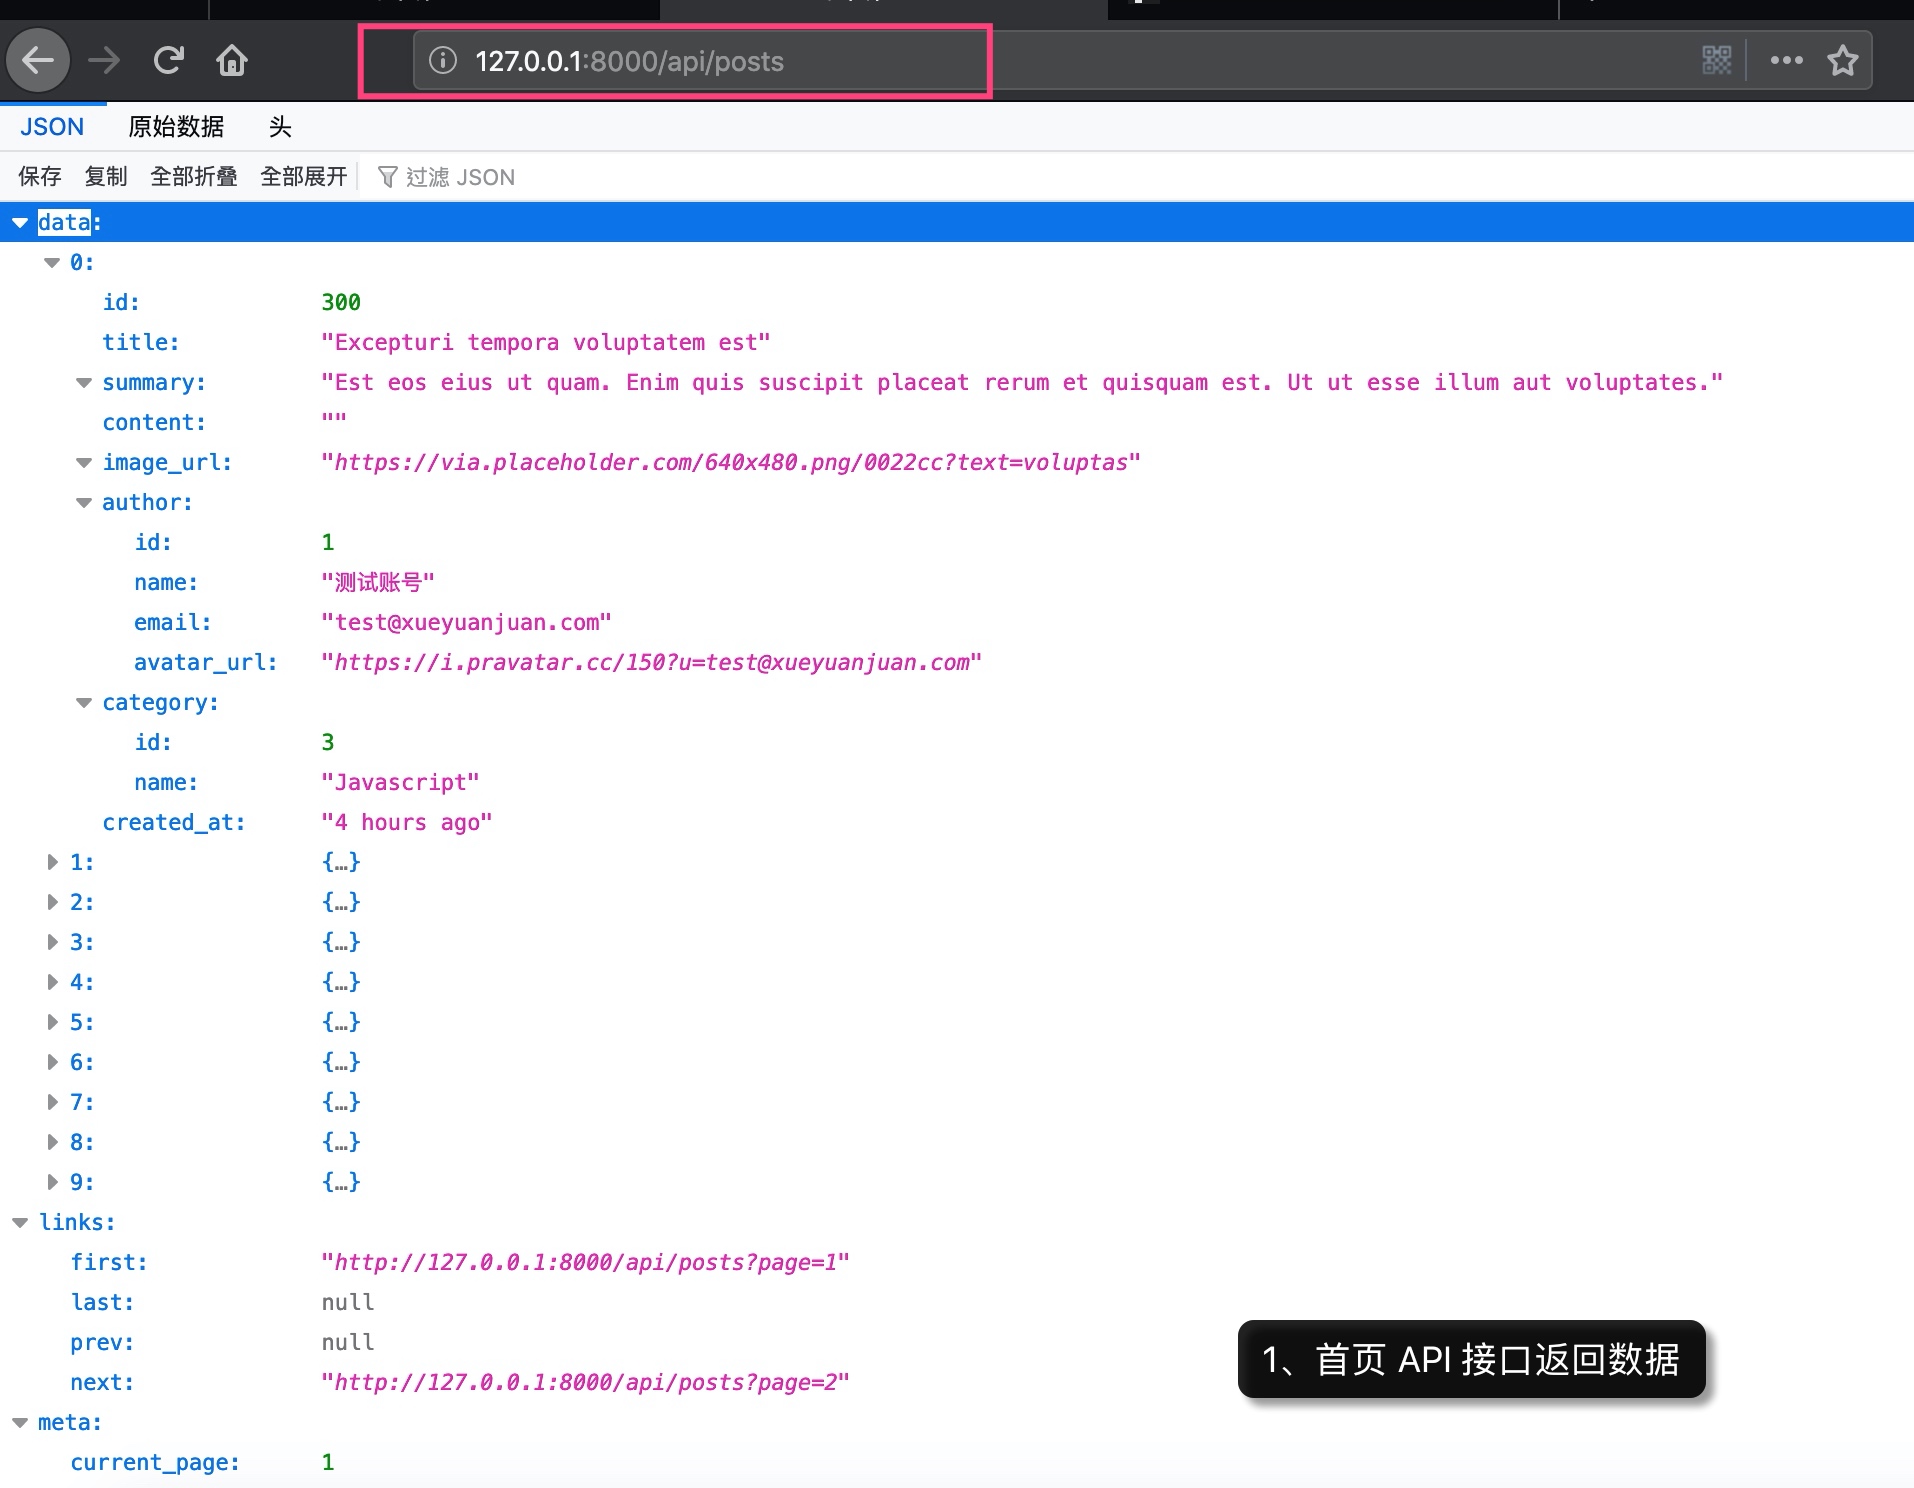
好了,再次访问博客应用所有文章相关 API 接口,现在所有文章数据都统一被封装到 data 字段中,并且客户端不需要再做其他处理,根据返回的接口数据就可以满足前端的渲染需求:
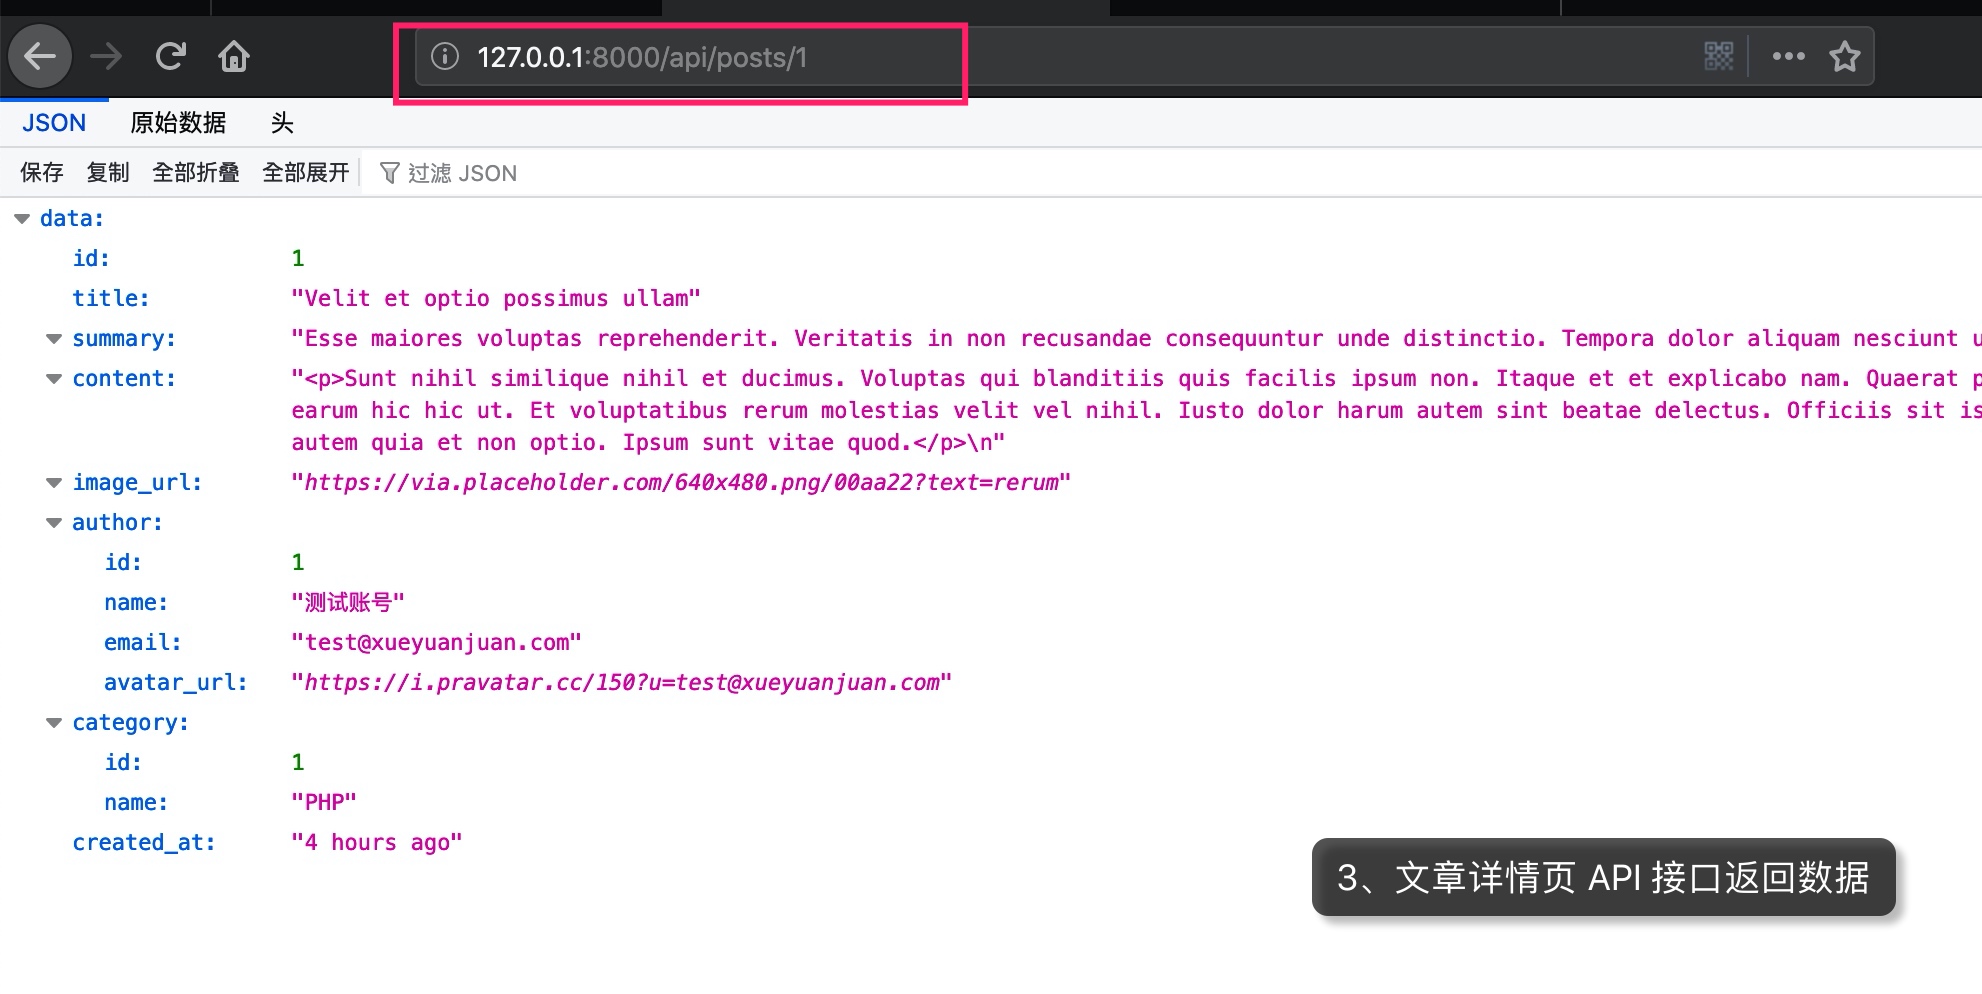
下篇教程,我们将在前端 Vue 组件中根据这些文章 API 接口返回数据来渲染博客应用前端页面。
所有源码可以通过 Github 代码仓库中获取:https://github.com/nonfu/demo-spa.git。
无评论