基于 Swoole 开发实时在线聊天室(五):Homestead 开发环境初始化
前段时间有同学咨询学院君如何在 Homestead 中使用 Swoole,就着这个系列顺便介绍下,同时也作为一个引子,介绍下如何扩展 Homestead 开发环境。
在 Homestead 中集成 Swoole 环境,当然不是每次重构 Homestead 后都要去手动安装 Swoole 扩展,或者每次创建新站点都要手动配置基于 Swoole HTTP 服务器驱动的 Nginx 反向代理,这样太费劲了,我们完全可以基于 Homestead 提供的扩展机制将这些操作通过配置实现自动化,接下来,学院君就以 Mac 环境 + Homestead 8.1.0 版本为例演示下如何在 Homestead 中集成 Laravel + Swoole 开发环境。
安装 Swoole 扩展
安装脚本
要使用 Swoole,首先要安装对应的 PHP 扩展,以全局共用的 Homestead 为例,进入 Homestead 项目根目录,打开 after.sh 文件,在文件末尾添加如下安装启用 Swoole 扩展的命令:
# 安装 Swoole 扩展
sudo pecl install swoole
sudo echo "extension=swoole.so" > /tmp/swoole.ini
sudo cp /tmp/swoole.ini /etc/php/7.3/mods-available/swoole.ini    # 直接写入报无权限错误,所以这里通过 tmp 目录做了下中转
sudo ln -fs /etc/php/7.3/mods-available/swoole.ini /etc/php/7.3/cli/conf.d/20-swoole.ini
注:学院君使用的 Homestead 默认 PHP 版本是 7.3,所以我安装的 Swoole 扩展默认适用于 7.3 版本,如果你的 Homestead 默认 PHP 是其它版本,这里需要调整启用该扩展的对应 PHP 版本目录。
after.sh 脚本会在 Homestead 重构(provision)之后运行,所以每次重构 Homestead 开发环境时,都会重新安装 Swoole 扩展,这样,就不需要我们自己登录到 Homestead 虚拟机手动安装了。
检查是否安装成功
接下来,我们在 Homestead 项目目录下运行 vagrant reload --provision 重启 Homestead,再通过 homestead ssh 登录到虚拟机,运行 php -m 查看已启用扩展,看到 swoole 在列表中则表示安装成功:
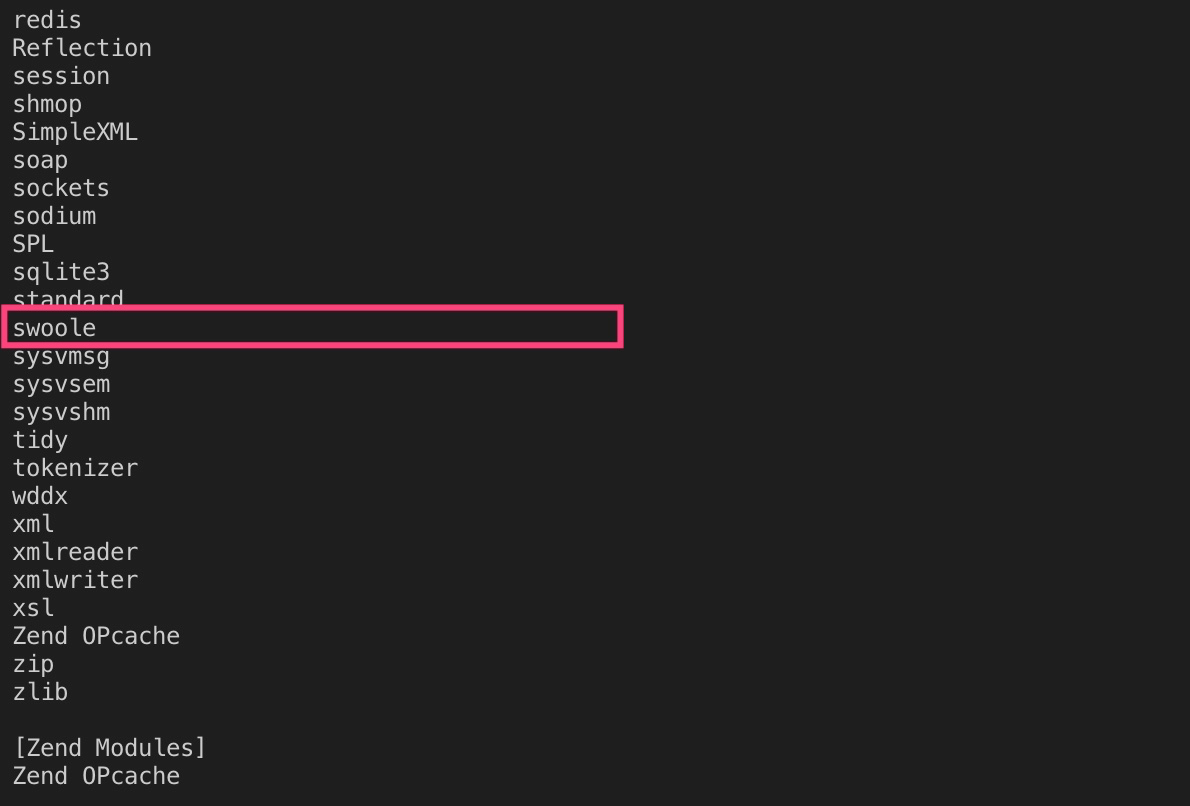
至此,Swoole 扩展已经安装成功,表示我们可以在 Homestead 虚拟机中使用 Swoole 扩展包提供的各种 API 了。
自动配置 Swoole 类型站点
但是,我们知道,Homestead 还有一个很强大的功能就是可以通过配置 Homestead.yaml 配置文件实现宿主机与虚拟机的目录映射,以及对应 Nginx 虚拟主机和数据库的自动创建和配置,我们能否扩展该功能支持 Swoole 类型站点呢,当然可以,接下来,学院君就来给大家演示下如何实现。
Homestead 站点初始化流程
在此之前,我们先大致看一下 Homestead 虚拟机的启动过程,在入口文件 Vagrantfile 中,会加载 Homestead 配置文件以及 Homestead 主文件:
...

homesteadYamlPath = confDir + "/Homestead.yaml"
homesteadJsonPath = confDir + "/Homestead.json"
afterScriptPath = confDir + "/after.sh"
customizationScriptPath = confDir + "/user-customizations.sh"
aliasesPath = confDir + "/aliases"

require File.expand_path(File.dirname(__FILE__) + '/scripts/homestead.rb')

...
然后读取配置文件并通过 Homestead.configure 方法解析并初始化这些配置:
...

if File.exist? homesteadYamlPath then
    settings = YAML::load(File.read(homesteadYamlPath))
elsif File.exist? homesteadJsonPath then
    settings = JSON::parse(File.read(homesteadJsonPath))
else
    abort "Homestead settings file not found in #{confDir}"
end

Homestead.configure(config, settings)

...
Homestead.configure 方法定义在上面引入的 scripts/homestead.rb 文件中,Homestead.yaml 里的所有配置都在这里解析并映射到对应的 Vagrant 配置上,实现虚拟机的自定义配置,由于 Vagrant 基于 Ruby 实现,所以这里的代码都是通过 Ruby 编写的。
Homestead 原生支持以下类型站点:
- laravel(默认)
- apache
- apigility
- expressive
- proxy
- silverstripe
- statamic
- symfony2
- symfony4
- zf
不包含 Swoole,所以我们需要配置 Homestead 支持 swoole 类型站点,不同类型站点数据库和目录映射配置都是一样的,不同的是 Nginx 虚拟主机配置,所以我们重点关注 sites 配置项的解析。在 Homestead.configure 方法中找到如下这行:
# Install All The Configured Nginx Sites
if settings.include? 'sites'
Nginx 站点配置从这里开始初始化,Homestead 会循环遍历所有 sites 配置开始初始化每个站点:
settings['sites'].each do |site|
其它共用流程都一样,主要是看不同类型站点如何处理:
# Convert the site & any options to an array of arguments passed to the
# specific site type script (defaults to laravel)
s.path = script_dir + "/site-types/#{type}.sh"
s.args = [
    site['map'],                # $1
    site['to'],                 # $2
    site['port'] ||= http_port, # $3
    site['ssl'] ||= https_port, # $4
    site['php'] ||= '7.3',      # $5
    params ||= '',              # $6
    site['xhgui'] ||= '',       # $7
    site['exec'] ||= 'false',   # $8
    headers ||= '',             # $9
    rewrites ||= ''             # $10
]
这里的 #{type} 对应的正是 Homestead.yaml 中 sites 配置下的站点类型配置项 type,所有支持的站点类型配置脚本都位于 scripts/site-types 目录下:

Homestead 会将 Homestead.yaml 配置文件中读取的站点配置项传递到不同类型的站点脚本文件中,完成 Nginx 虚拟主机文件的创建和初始化,并且每个配置项对应了一个参数编号,以便在脚本文件中引用,有了以上这些了解,大家应该很清楚如何在 Homestead 中自定义新的站点类型了。
创建 Swoole 类型站点脚本
我们依样画葫芦,在 scripts/site-types 目录下新增一个 swoole.sh 文件,并编写脚本内容如下:
#!/usr/bin/env bash

declare -A params=$6       # Create an associative array
declare -A headers=${9}    # Create an associative array
declare -A rewrites=${10}  # Create an associative array
paramsTXT=""
if [ -n "$6" ]; then
   for element in "${!params[@]}"
   do
      paramsTXT="${paramsTXT}
      fastcgi_param ${element} ${params[$element]};"
   done
fi
headersTXT=""
if [ -n "${9}" ]; then
   for element in "${!headers[@]}"
   do
      headersTXT="${headersTXT}
      add_header ${element} ${headers[$element]};"
   done
fi
rewritesTXT=""
if [ -n "${10}" ]; then
   for element in "${!rewrites[@]}"
   do
      rewritesTXT="${rewritesTXT}
      location ~ ${element} { if (!-f \$request_filename) { return 301 ${rewrites[$element]}; } }"
   done
fi

if [ "$7" = "true" ]
then configureXhgui="
location /xhgui {
        try_files \$uri \$uri/ /xhgui/index.php?\$args;
}
"
else configureXhgui=""
fi

# 设置 WebSocket 服务器名称
websocketServer=`echo "${1}" | sed "s/^\(.*\)\.test$/\1/g"`

block="map \$http_upgrade \$connection_upgrade {
    default upgrade;
    ''      close;
}

upstream $websocketServer {
    # Connect IP:Port
    server 127.0.0.1:5200 weight=5 max_fails=3 fail_timeout=30s;
    keepalive 16;
}

server {
    listen ${3:-80};
    listen ${4:-443} ssl http2;
    server_name $1;
    root \"$2\";

    index index.html index.htm index.php;

    charset utf-8;

    $rewritesTXT

    location / {
        try_files \$uri @$websocketServer;
        $headersTXT
    }

    $configureXhgui

    location = /favicon.ico { access_log off; log_not_found off; }
    location = /robots.txt  { access_log off; log_not_found off; }

    access_log off;
    error_log  /var/log/nginx/$1-error.log error;

    sendfile off;

    client_max_body_size 100m;

    location ~ \.php$ {
        return 404;
    }

    # 处理 WebSocket 通信
    location ^~ /ws/ {
        # proxy_connect_timeout 60s;
        # proxy_send_timeout 60s;
        # proxy_read_timeout: Nginx will close the connection if the proxied server does not send data to Nginx in 60 seconds; At the same time, this close behavior is also affected by heartbeat setting of Swoole.
        # proxy_read_timeout 60s;
        proxy_http_version 1.1;
        proxy_set_header X-Real-IP \$remote_addr;
        proxy_set_header X-Real-PORT \$remote_port;
        proxy_set_header X-Forwarded-For \$proxy_add_x_forwarded_for;
        proxy_set_header Host \$http_host;
        proxy_set_header Scheme \$scheme;
        proxy_set_header Server-Protocol \$server_protocol;
        proxy_set_header Server-Name \$server_name;
        proxy_set_header Server-Addr \$server_addr;
        proxy_set_header Server-Port \$server_port;
        proxy_set_header Upgrade \$http_upgrade;
        proxy_set_header Connection \$connection_upgrade;
        proxy_pass http://$websocketServer;
    }

    location @$websocketServer {
        # proxy_connect_timeout 60s;
        # proxy_send_timeout 60s;
        # proxy_read_timeout 60s;
        proxy_http_version 1.1;
        proxy_set_header Connection \"\";
        proxy_set_header X-Real-IP \$remote_addr;
        proxy_set_header X-Real-PORT \$remote_port;
        proxy_set_header X-Forwarded-For \$proxy_add_x_forwarded_for;
        proxy_set_header Host \$http_host;
        proxy_set_header Scheme \$scheme;
        proxy_set_header Server-Protocol \$server_protocol;
        proxy_set_header Server-Name \$server_name;
        proxy_set_header Server-Addr \$server_addr;
        proxy_set_header Server-Port \$server_port;
        proxy_pass http://$websocketServer;
    }

    location ~ /\.ht {
        deny all;
    }

    ssl_certificate     /etc/nginx/ssl/$1.crt;
    ssl_certificate_key /etc/nginx/ssl/$1.key;
}
"

echo "$block" > "/etc/nginx/sites-available/$1"
ln -fs "/etc/nginx/sites-available/$1" "/etc/nginx/sites-enabled/$1"
这里面的主要逻辑就是创建 Swoole 类型站点的 Nginx 虚拟主机配置,为了便于扩展,我们将反向代理服务器名称通过解析站点域名来进行设置:
# 设置 WebSocket 服务器名称
websocketServer=`echo "${1}" | sed "s/^\(.*\)\.test$/\1/g"`
当然,这里存在一些硬编码,比如域名后缀仅支持 *.test,反向代理服务器 IP 和端口号也写死了:
upstream $websocketServer {
    # Connect IP:Port
    server 127.0.0.1:5200 weight=5 max_fails=3 fail_timeout=30s;
    keepalive 16;
}
这对于应付本地开发一般足够了,如果你想要让其扩展性更强,可以参照上面的站点配置解析和初始化流程引入新的参数来配置这些选项,这里,学院君就不具体展开了。
配置 Swoole 类型站点
接下来,我们就可以打开 Homestead.yaml 配置文件,配置 swoole 类型站点了:
folders:
    ... // 其它目录映射
    - map: ~/Docker/wwwroot/webchat
      to: /home/vagrant/webchat

sites:
    ... // 其它站点映射
    - map: webchat.test
      to: /home/vagrant/webchat/public
    - map: webchats.test
      to: /home/vagrant/webchat/public
      type: swoole

databases:
    ... // 其它数据库
    - webchat
注意,在这里我们同时创建了基于 PHP-FPM 和 Swoole 作为 PHP 反向代理服务器的 Nginx 虚拟主机配置。
在宿主机 /etc/hosts 中添加虚拟域名 webchat.test 和 webchats.test:
192.168.10.10 webchat.test
192.168.10.10 webchats.test
至此,我们就完成了所有基于 Homestead 虚拟机的 Swoole 开发环境配置。
启动 Laravel + Swoole 聊天室项目
接下来,我们可以通过 vagrant reload --provision 重启虚拟机让 Swoole 类型站点配置生效,然后修改 webchat 项目的环境配置文件 .env 如下:
APP_URL=http://webchats.test

DB_CONNECTION=mysql
DB_HOST=127.0.0.1
DB_PORT=3306
DB_DATABASE=webchat
DB_USERNAME=homestead
DB_PASSWORD=secret

LARAVELS_LISTEN_IP=127.0.0.1
LARAVELS_LISTEN_PORT=5200
登录到虚拟机,在 webchat 目录下运行如下命令启动 Swoole HTTP 服务器:
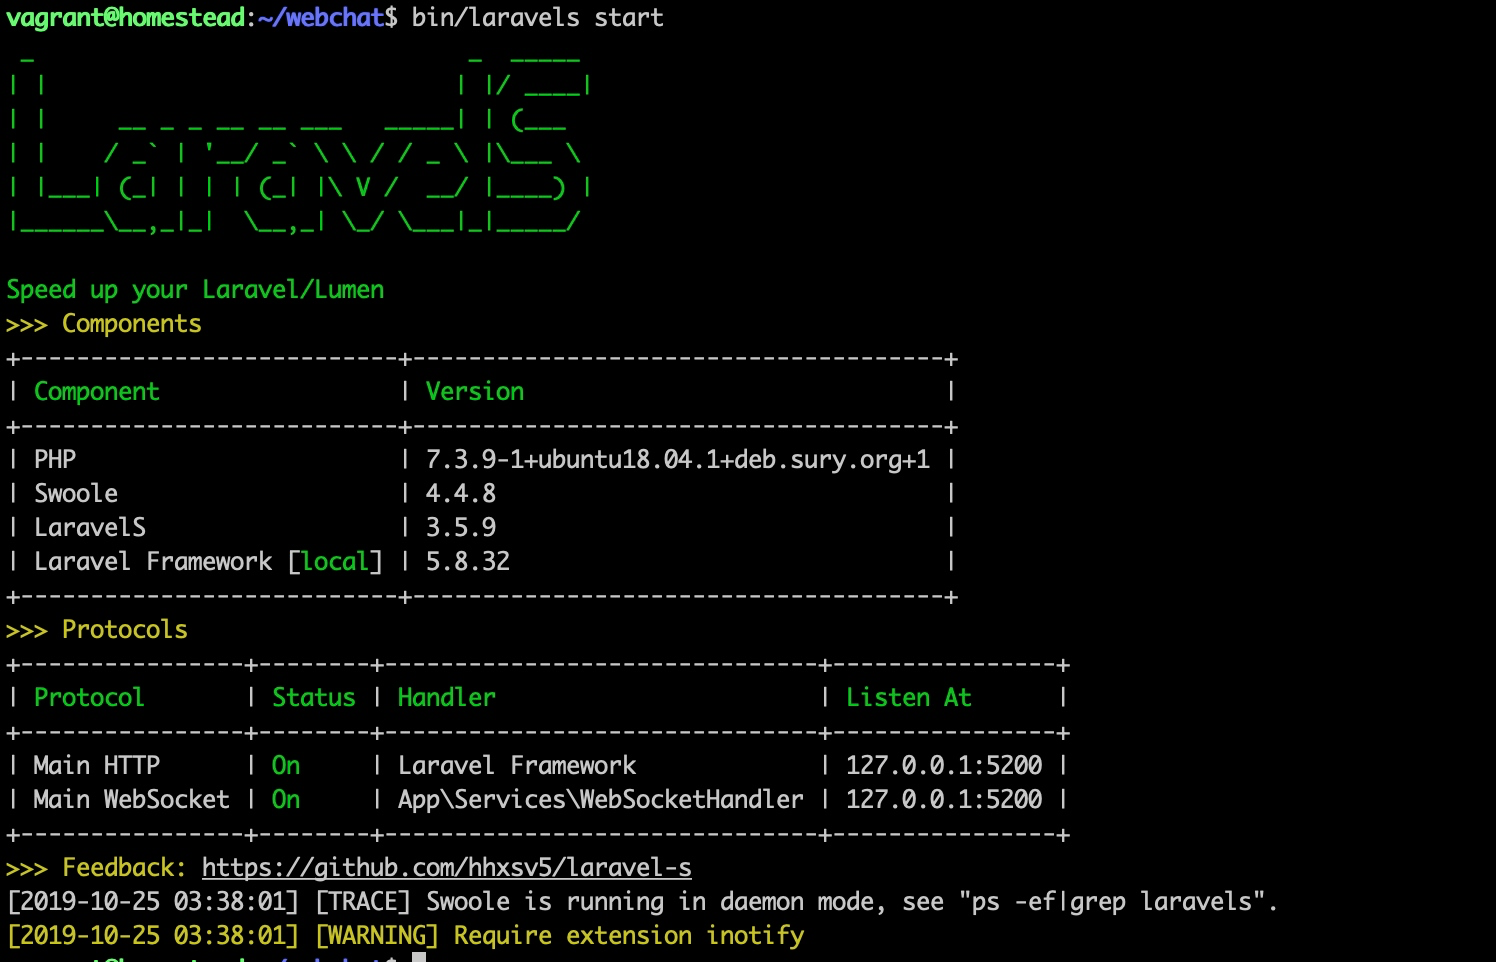
运行功能测试脚本访问首页 http://webchats.test 成功:

这样,我们就完成了将 Swoole 驱动的 Laravel + Vue 聊天室项目整合到 Homestead 开发环境进行开发测试。
4 条评论
学院君好~ sudo ln -fs /etc/php/7.3/mods-available/swoole.ini /etc/php/7.3/cli/conf.d/20-swoole.ini 20-swoole.ini前面的数字20有啥意义?是代表加载顺序吗?
是的 扩展之间可能存在依赖关系 通过这个数字来对扩展进行排序 加载的时候按照这个顺序加载就没有问题了
homestead8.0版本,需要将swoole.sh,改为serve-swoole.sh。 shell provisioner:
pathfor shell provisioner does not exist on the host system: C:/Users/ls/Homestead/scripts/serve-swoole.sh这里封装的广播,把自己除去了。如果想给包括自己的人广播,要不多一个
emit,要不改这边的逻辑。