部门 API 开发
接下来正式进入代码开发阶段,我们采用 TDD 模式进行开发。先来完成部门模块的功能代码开发。
创建部门
测试用例
删除 Feature 和 Unit 目录下的 ExampleTest.php 文件。
在 tests/Feature 目录下新建部门创建对应的测试文件 CreateDepartmentTest.php:

编写第一个测试用例,用于测试部门创建接口是否可以调用成功:
<?php

use App\Models\Department;
use App\Models\User;
use Laravel\Sanctum\Sanctum;

use function Pest\Laravel\postJson;

it('should create a department', function() {
    // 创建部门接口需要认证
    Sanctum::actingAs(User::factory()->create(), ['*']);

    // 调用 API 接口
    $department = postJson(route('departments.store'), [
        'name' => 'Development',
        'description' => 'Awesome developers across the board!',
    ])->json('data');

    // 断言响应数据
    expect($department)
        ->attributes->name->toBe('Development')
        ->attributes->description->toBe('Awesome developers across the board!');
});
然后编写第二个测试用例,用于测试部门名称这个请求字段的校验规则(必填且唯一):
it('should return 422 if name is invalid', function (?string $name) {
    Sanctum::actingAs(User::factory()->create(), ['*']);

    // 通过模型工厂先创建一个同名部门
    Department::factory([
        'name' => 'Development',
    ])->create();

    // 通过 assertInvalid 方法断言 name 是否校验不通过
    postJson(route('departments.store'), [
        'name' => $name,
        'description' => 'description',
    ])->assertInvalid(['name']);
})->with([
    '',
    null,
    'Development'
]);  // 传递不同值作为 $name 参数进行测试
注意到这里我们使用了 with 方法传入多个 $name 参数,以便在同一个测试用例中测试参数的各种边界情况,执行测试用例时,会依次传入这些参数进行测试,非常方便。
assertInvalid 是 Laravel 8.x 新增的特性,之前版本是没有这个断言方法的。
以上是对 POST /departments API 接口的测试,运行测试,此时会失败:
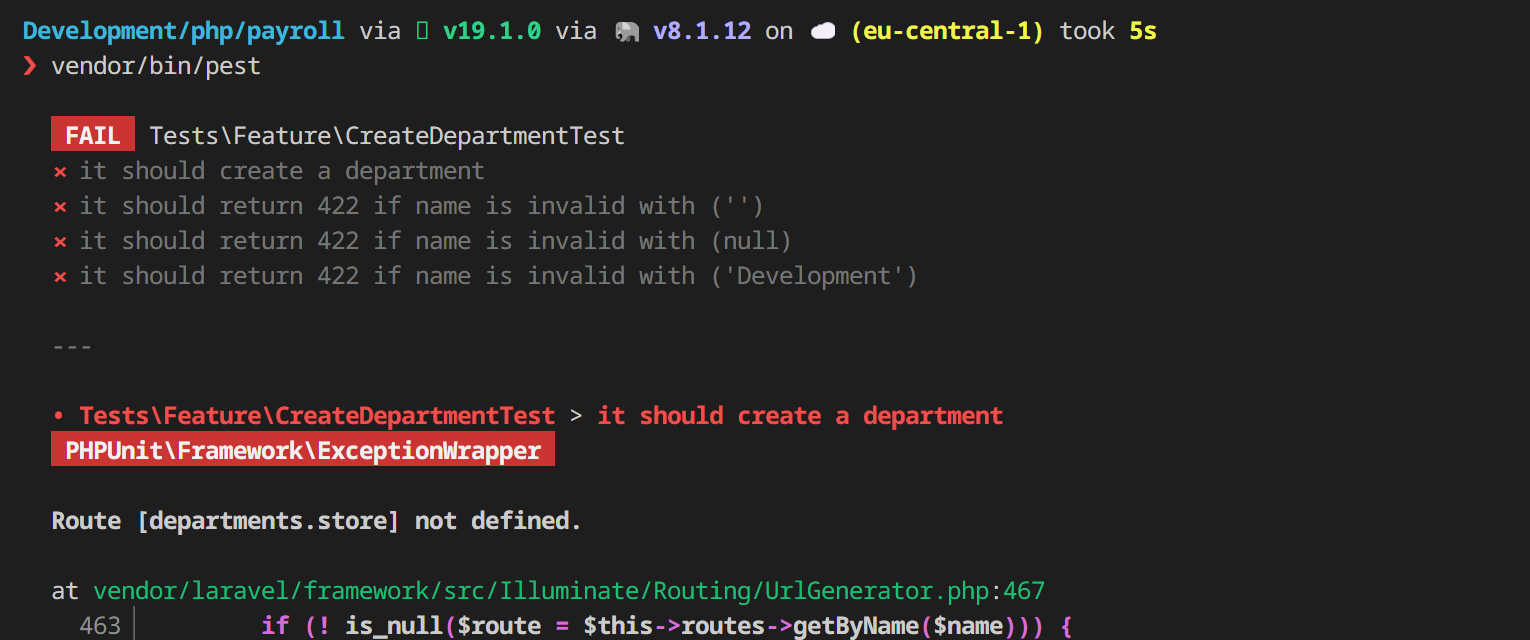
按照 TDD 基本流程中的步骤,一个标准的 TDD 流程是:
The red -> The green -> The refactor
即先写测试用例(Red),然后编写业务代码,让测试用例通过(Green),最后在测试用例的保护下不断迭代重构(Refactor),所以下一步需要先编写业务代码。
业务代码
在上篇教程中,学院君提到会落地一些 DDD 的概念来让代码复用性更好、结构更清晰、更具备可读性。在 DDD 中,用户请求数据会被封装到 DTO 对象统一结构化,然后传递给领域层,这里我们在 app/DTOs 目录下新建一个 DTO 类 DepartmentData 来封装新建部门的请求数据:
<?php

namespace App\DTOs;

class DepartmentData
{
    public function __construct(
        public readonly string $name,
        public readonly ?string $description
    ) {}
}
我们不会创建单独的 Service 来处理业务逻辑,因为和传统 MVC 模式容易导致胖模型一样,Service 也很容易膨胀为胖服务,为了解决这个问题,在 Laravel 中可以创建 Action 以单一职责模式处理单个用户故事,Action 可以被控制器、队列任务、命令行等多种入口调用,从而提高了代码复用性。这里我们在 app/Actions 目录下新建一个 CreateDepartmentAction.php,然后在 Action 类中定义一个 execute 方法处理实际业务逻辑 —— 新建部门,CreateDepartmentAction 接收部门 DTO 对象作为参数,返回 Department 模型类实例:
<?php

namespace App\Actions;

use App\DTOs\DepartmentData;
use App\Models\Department;

class CreateDepartmentAction
{
    public function execute(DepartmentData $departmentData): Department
    {
        return Department::create([
            'name' => $departmentData->name,
            'description' => $departmentData->description,
        ]);
    }
}
此外,我们还新建了一个专门处理新建部门的表单请求类 StoreDepartmentRequest 用于对请求数据进行验证:

<?php

namespace App\Http\Requests;

use Illuminate\Foundation\Http\FormRequest;

class StoreDepartmentRequest extends FormRequest
{
    /**
     * Determine if the user is authorized to make this request.
     *
     * @return bool
     */
    public function authorize()
    {
        return true;
    }

    /**
     * Get the validation rules that apply to the request.
     *
     * @return array<string, mixed>
     */
    public function rules()
    {
        return [
            'name' => 'required|unique:departments|max:50',
            'description' => 'string'
        ];
    }
}
创建一个 API Resource 类 DepartmentResource 来封装响应的 JSON 数据(先通过自带的处理,后面再重构优化):

最后,我们新建一个资源控制器 DepartmentController ,在 store 方法中把以上操作都串起来(编排),形成一个完整的新建部门功能,包括表单请求验证、DTO对象转化、Action调用、响应数据包装及返回:

<?php

namespace App\Http\Controllers;

use App\Actions\CreateDepartmentAction;
use App\DTOs\DepartmentData;
use App\Http\Requests\StoreDepartmentRequest;
use App\Http\Resources\DepartmentResource;
use Illuminate\Http\Request;
use Illuminate\Http\Response;

class DepartmentController extends Controller
{
    public function __construct(
        public readonly CreateDepartmentAction $createDepartment
    ) {
    }

    ...

    /**
     * Store a newly created resource in storage.
     *
     * @param  \Illuminate\Http\Request  $request
     * @return \Illuminate\Http\Response
     */
    public function store(StoreDepartmentRequest $request)
    {
        $departmentData = new DepartmentData(...$request->validated());
        $department = $this->createDepartment->execute($departmentData);

        return DepartmentResource::make($department)
            ->response();
    }

    ...
}
...$request->validated() 使用 PHP 8 最新提供的命名参数功能。
有赖于不同业务逻辑单元的拆分,控制器中的代码变得非常简单优雅。
最后我们在 API 路由文件 routes/api.php 中定义控制器的入口:
<?php

use App\Http\Controllers\DepartmentController;
use Illuminate\Support\Facades\Route;

Route::apiResource('departments', DepartmentController::class);
再次运行测试用例,结果显示绿色,就表示测试通过了:
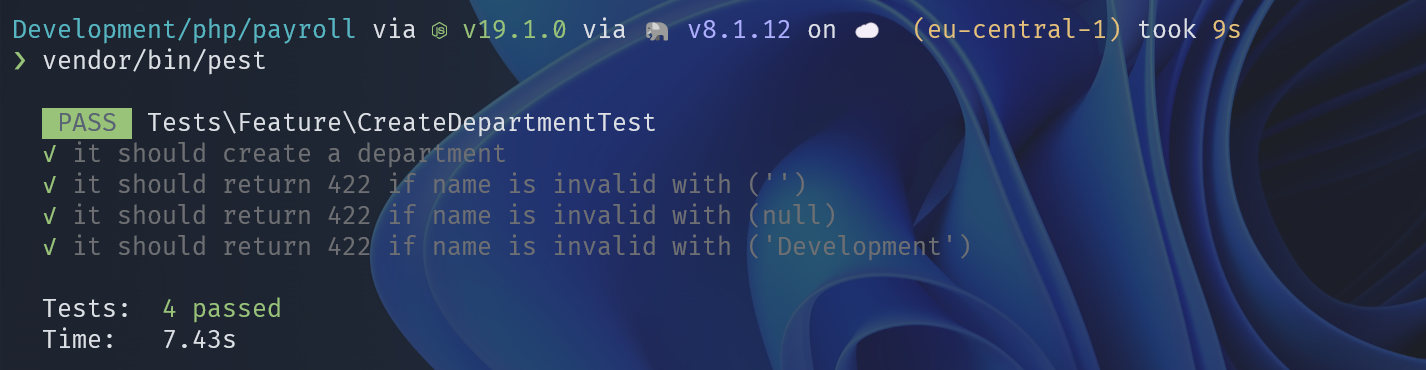
至此,我们就基于 TDD 模式完成了部门创建 API 接口的开发。
更新部门
测试用例
再看下一个功能 —— 更新部门,基本流程和创建部门一样,先新建一个部门更新对应的测试用例文件:

编写测试用例:
<?php

use App\Models\Department;
use App\Models\User;
use Laravel\Sanctum\Sanctum;

use function Pest\Laravel\putJson;

it('should update a department', function (string $name, string $description) {
    Sanctum::actingAs(User::factory()->create(), ['*']);

    // 先新建
    $department = Department::factory([
        'name' => 'Development',
    ])->create();

    // 再调用更新 API 接口
    putJson(route('departments.update', compact('department')), [
        'name' => $name,
        'description' => $description,
    ])->assertNoContent();

    // 断言响应数据
    expect(Department::find($department->id))
        ->name->toBe($name)
        ->description->toBe($description);
})->with([
    ['name' => 'Development', 'description' => 'Updated Description'],
    ['name' => 'Development New', 'description' => 'Updated Description'],
]);
和新建部门一样,我们也通过 with 方法传入了多组参数,以测试不同的场景,这里需要注意的是 PUT 请求响应 Body 为空,所以直接去数据库查询并进行断言。
此时运行测试用例肯定是不通过的,需要编写部门更新对应的业务代码。
业务代码
参照部门新建的业务代码,部门 DTO 类在更新场景可以复用,我们在 app/Actions 目录下新建一个 UpdateDepartmentAction Action 处理部门更新的业务逻辑(其实创建和更新基本流程一致,两个 Action 也是可以合并的,底层使用模型类的 updateOrCreate 完成创建和更新数据库的操作统一):
<?php
namespace App\Actions;

use App\DTOs\DepartmentData;
use App\Models\Department;

class UpdateDepartmentAction
{
    public function execute(Department $department, DepartmentData $departmentData): Department
    {
        $department->name = $departmentData->name;
        $department->description = $departmentData->description;
        $department->save();

        return $department;
    }
}
需要注意的是参数还传入了 Department 模型实例,主要为了避免同一个模型实例的多次数据库查询,不过这块代码实现是有优化空间的,我们后面再说,先完成基本功能,让测试用例通过,再考虑代码重构的事情。
新建一个更新部门接口的表单请求类 App\Http\Requests\UpdateDepartmentRequest,注意这里的 name 规则校验和新建部门有所区别,需要排除掉自己这条记录再做唯一性校验,否则如果不改部门名称,请求始终会校验失败:
<?php

namespace App\Http\Requests;

use Illuminate\Foundation\Http\FormRequest;
use Illuminate\Validation\Rule;

class UpdateDepartmentRequest extends FormRequest
{
    /**
     * Determine if the user is authorized to make this request.
     *
     * @return bool
     */
    public function authorize()
    {
        return true;
    }

    /**
     * Get the validation rules that apply to the request.
     *
     * @return array<string, mixed>
     */
    public function rules()
    {
        return [
            'name' => [
                'required',
                'string',
                'max:50',
                Rule::unique('departments', 'name')->ignore($this->department),
            ],
            'description' => 'nullable|sometimes|string'
        ];
    }
}
最后在部门控制器的 update方法中把上面这些操作编排起来,完成部门更新的完整流程:
class DepartmentController extends Controller
{
    public function __construct(
        public readonly CreateDepartmentAction $createDepartment,
        public readonly UpdateDepartmentAction $updateDepartment
    ) {}

    ...

    public function update(UpdateDepartmentRequest $request, Department $department)
    {
        $departmentData = new DepartmentData(...$request->validated());
        $department = $this->updateDepartment->execute($department, $departmentData);

        return response()->noContent();
    }

    ...
}
PUT 请求没有响应 Body,所有不需要资源类包装响应数据。
再次运行测试用例,这个时候可以看到测试通过了:
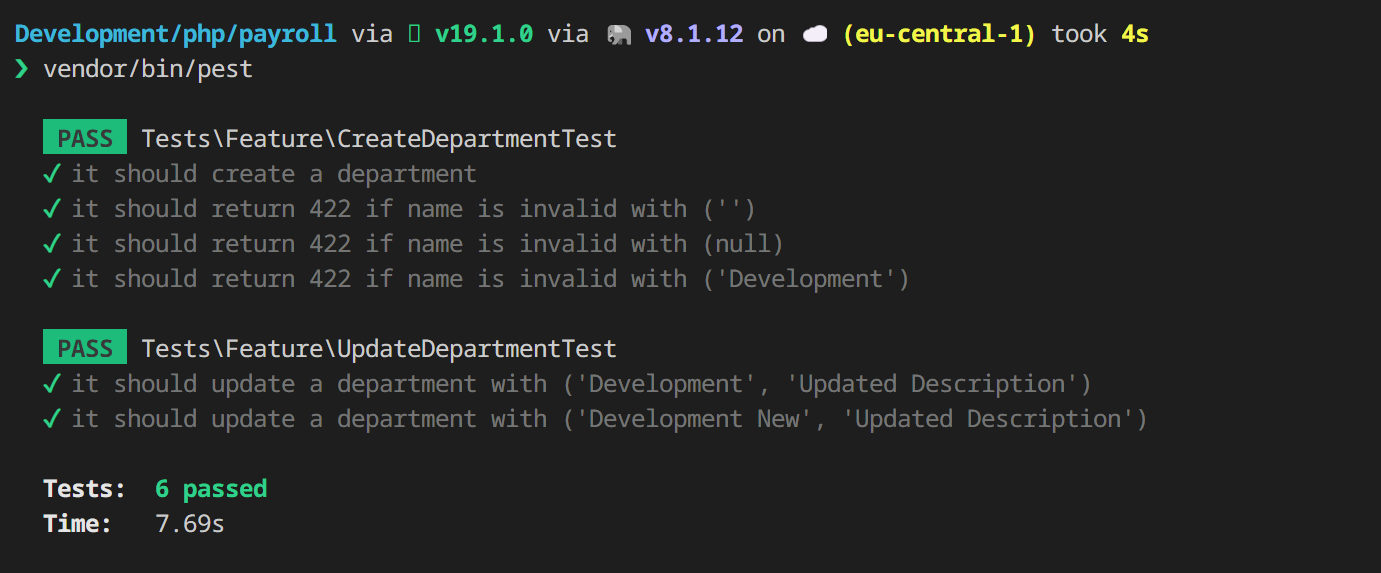
这样我们就基于 TDD 模式完成了第二个 API 接口 —— 部门更新的功能开发。
非常轻松是不是?只要测试用例考虑的足够充分,采用 TDD 模式实现的业务代码质量会很高,而且这样一层一层迭代下去,环环相扣,每一步都很有信心,将来回归测试成本也极低,不容易出现漏测场景,最终开发者也会对自己的代码和系统更有信心。
获取部门
最后我们来看下获取部门的功能实现。基本流程和上面一样,我们新建一个 GetDepartmentTest.php 测试文件,简单编写一个获取单个部门和获取部门列表的测试用例:
<?php

use App\Models\Department;

use function Pest\Laravel\getJson;

it('should return a department', function () {
    $development = Department::factory(['name' => 'Development'])->create();

    $department = getJson(route('departments.show', ['department' => $development]))
        ->json('data');

    expect($department)
        ->attributes->name->toBe('Development');
});

it('should return all departments', function () {
    $names = ['Development', 'Market', 'Administration'];
    foreach ($names as $name) {
        Department::factory(['name' => 'Development'])->create();
    }

    $departments = getJson(route('departments.index'))->json('data');

    expect($departments)->toHaveCount(3);
});
这里我们假设 API 接口是遵循 JSON API 规范的,所以我们试图从 data 字段里面获取数据,从 data.attributes 里面获取属性数据。
代码实现则更简单,因为不需要关注表单验证、DTO、Action 之类,因为逻辑很简单,控制器直接返回即可,部门控制器的 index和show方法如下所示:
class DepartmentController extends Controller
{
    ...

    public function index()
    {
        return DepartmentResource::collection(Department::all());
    }

    public function show(Department $department)
    {
        return DepartmentResource::make($department);
    }

    ...
}
为了满足对 JSON API 规范的适配,需要调整默认的 API Resource 类代码,让其继承自 JsonApiResource(上篇初始化教程中已经安装过 JSON:API Resource 扩展包),并编写 toAttributes 方法定义映射关系:
<?php

namespace App\Http\Resources;

use TiMacDonald\JsonApi\JsonApiResource;

class DepartmentResource extends JsonApiResource
{
    public function toAttributes($request): array
    {
        return [
            'name' => $this->name,
            'description' => $this->description,
        ];
    }
}
运行测试用例,可以看到测试通过:
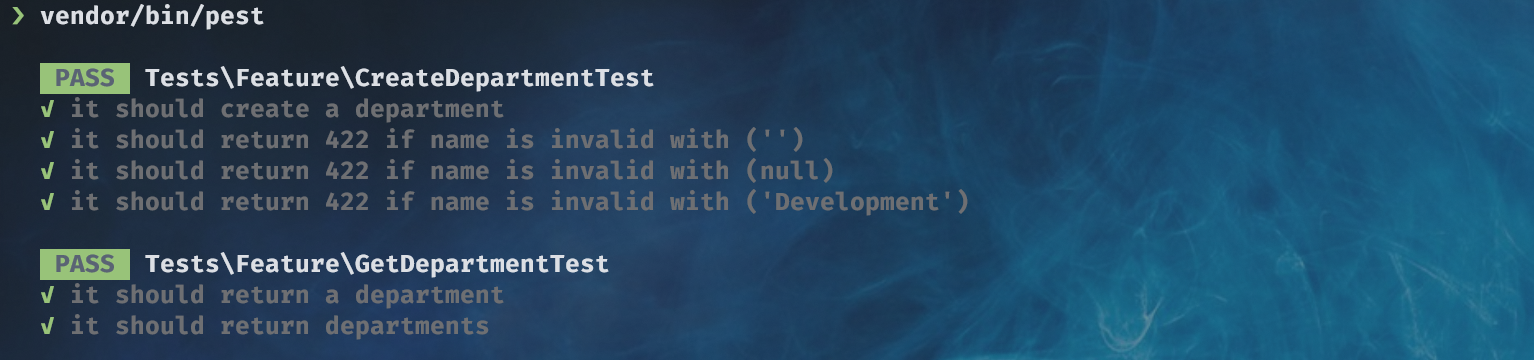
对于这种查询类请求,我们需要重点关注下资源本身及关联资源的 JSON 响应数据封装,复杂性主要在这里。
关联资源
部门会关联员工,如果想要在响应结果中包含关联的员工信息,需要先创建 EmployeeResource 资源类,让其继承自 JsonApiResource,并定义其 toAttributes 方法:
<?php

namespace App\Http\Resources;

use TiMacDonald\JsonApi\JsonApiResource;

class EmployeeResource extends JsonApiResource
{
    /**
     * Transform the resource into an array.
     *
     * @param  \Illuminate\Http\Request  $request
     * @return array|\Illuminate\Contracts\Support\Arrayable|\JsonSerializable
     */
    public function toAttributes($request): array
    {
        return [
            'name' => $this->full_name,
            'job_title' => $this->job_title,
            'payment_type' => $this->payment_type,
            'salary' => $this->salary,
        ];
    }
}
然后在 DepartmentResource 的 toRelationships 方法定义部门关联的员工资源:
<?php

namespace App\Http\Resources;

use TiMacDonald\JsonApi\JsonApiResource;

class DepartmentResource extends JsonApiResource
{
    public function toAttributes($request): array
    {
        return [
            'name' => $this->name,
            'description' => $this->description,
        ];
    }

    public function toRelationships($request): array
    {
        return [
            'employees' => fn() => EmployeeResource::collection($this->employees)
        ];
    }

    public function toLinks($request): array
    {
        return [
            'self' => route('departments.show', ['department' => $this->uuid]),
        ];
    }
}
这样一来,就可以在获取部门的 API 接口中返回遵循 JSON API 规范的响应数据了,部门关联员工涉及到员工相关的业务代码,所以这里先不演示对应的测试用例,待完成下一篇教程中你就可以自行实现了。当然了,部门功能的实现代码有不少地方还有优化空间,学院君将在下篇教程的员工 API 开发过程中演示如何优化这些代码。
2 条评论
提到了
也可以提一下,readonly 是 8.1 的特性
开始没有使用JSON API的时候没有attributes,所以使用
->attributes无法正常测试,去掉后正常